
In this article, we will learn how to integrate MySQL with .Net Aspire. As you know, .Net Aspire is used to build cloud-native applications.
If want to learn How to integrate .NET Aspire with PostgreSQL
If want to learn https://tutexchange.com/how-to-integrate-net-aspire-with-redis/
In this article, we cover:
- Create a .Net Aspire Starter App.
- Solution Explorer
- Adding MySQL to App Host Project
- View after Adding Aspire.Hosting.MySql NuGet packages to the project.
- Adding MySQL Services to AppHost in Program.cs
- Various options to persist database.
- Adding WithDataVolume
- Adding WithDataBindMount
- Adding PhpMyAdmin
- Installing Packages in API Service Project.
- Adding Swashbuckle.AspNetCore.SwaggerGen NuGet package.
- Adding Swashbuckle.AspNetCore.SwaggerUI NuGet package.
- After adding the All NuGet package to the Project.
- Adding Model to API Service Project.
- Product Model
- Creating Database Context Class.
- Adding Class with name DataDbContext which is inheriting from DbContext class.
- After Registering MySQL database context
- Adding API Controller
- Added Empty API Controller
- API Controller Code Snippet
- Adding Services to Program.cs class of API Service
- Program.cs of AspireApp4.ApiService
- Aspire Dashboard
- Creating Database Using PhpMyAdmin.
- PhpMyAdmin Dashboard
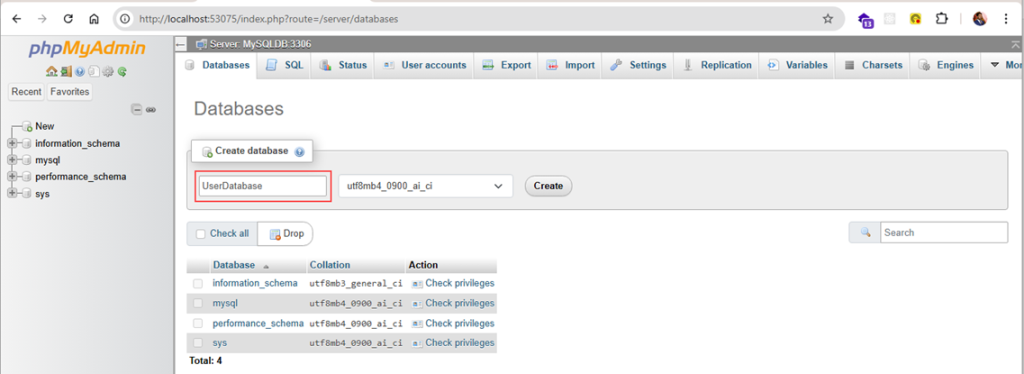
- Creating Database.
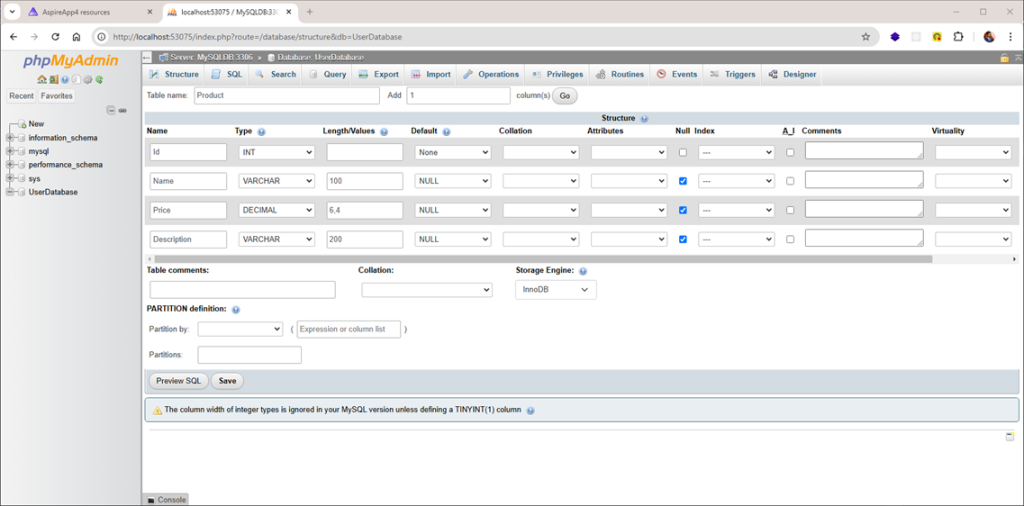
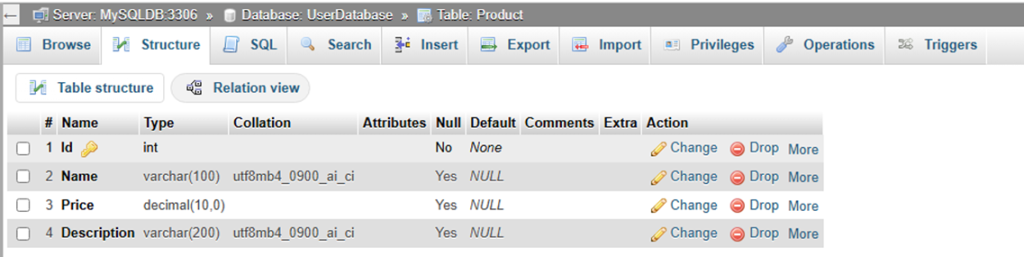
- Creating Table
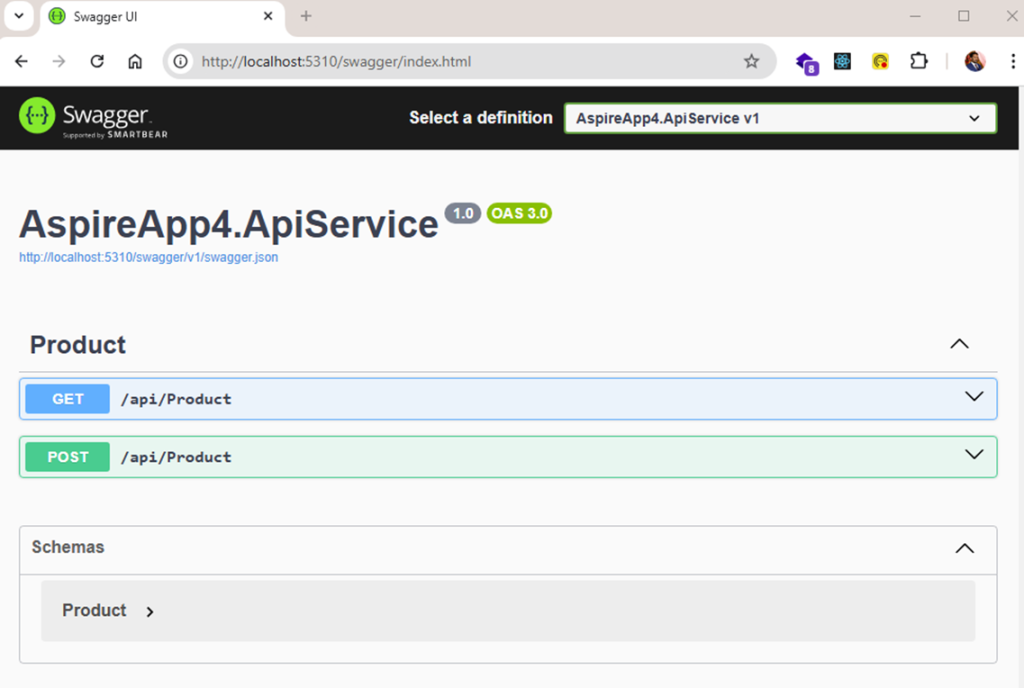
- API Documentation
- Call API Service for inserting data.
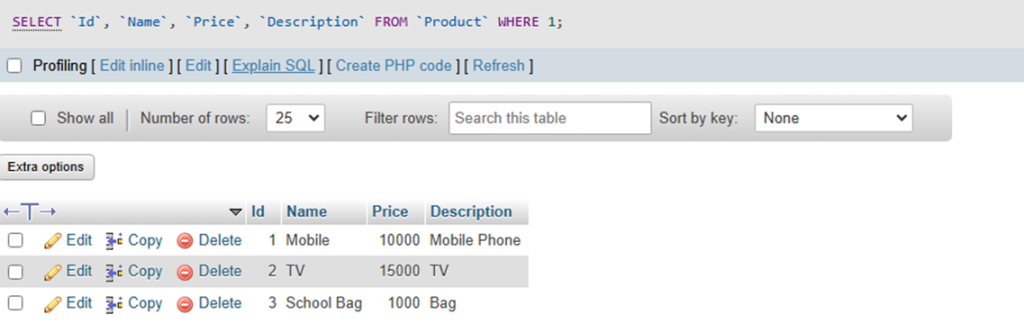
- To view the inserted data, we can utilize PhpMyAdmin.
- Call API Service for Reading data.
What is MySQL?
MySQL is an open-source relational database management system (RDBMS) that uses SQL to manage and organize structured data. It’s widely used for web applications, enterprise systems, and more, and it is known for its speed, reliability, scalability, and cross-platform support. Owned by Oracle, it has both free (Community) and paid (Enterprise) editions.

Create a .Net Aspire Starter App.

After selecting the project, click the “Next” button to proceed.
A new dialogue will prompt you to configure your new project. Within this dialogue, you will be asked to provide a Solution Name. You must also specify the location where the project should be saved.
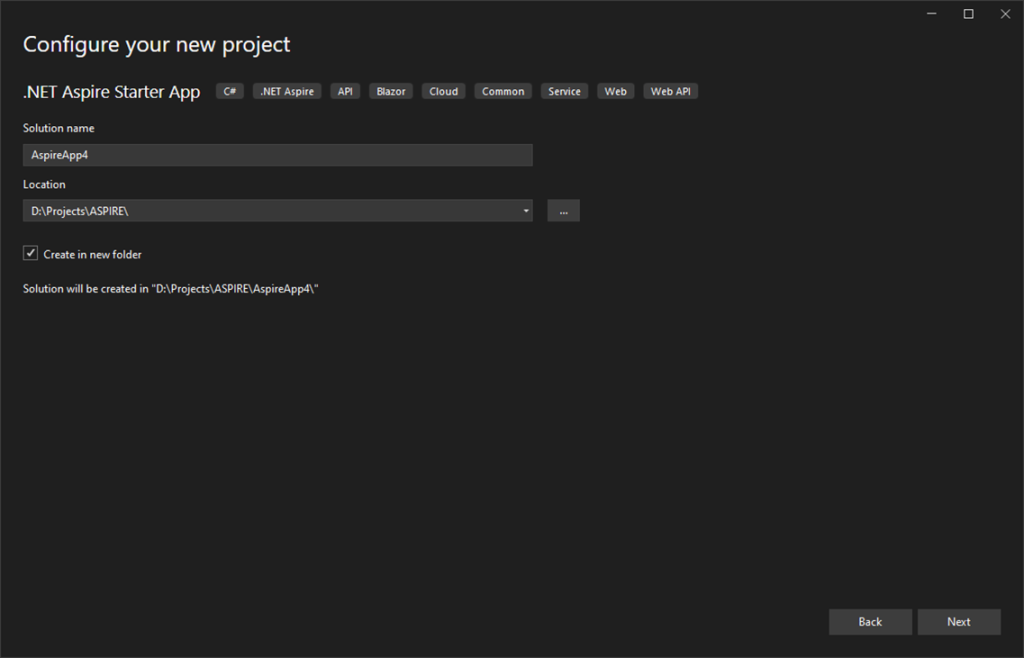
After entering details, click the “Next” button to continue.
A new dialogue will prompt you to configure additional information related to the project, such as the framework, the .NET Aspire version, and the choice to create a test project. For this demonstration, I will select .NET Aspire 9.0.

Click on the Create button to create an Aspire project.
After creating a project, you will see the Solution Explorer, which displays the project based on the provided input. In a .NET Starter project, you will find four projects:
- 1. API Service
- 2. AppHost
- 3. Service Default
- 4. Web
- ApiService:
- A Minimal API project in ASP.NET Core that supplies data to the front-end application. It relies on the ServiceDefaults project for shared configurations.
- AppHost:
- Acts as the orchestrator project, responsible for integrating and configuring various components and services in the application. It should be set as the Startup project and depends on ApiService and Web.
- ServiceDefaults:
- A shared .NET project that handles reusable configurations for resilience, service discovery, and telemetry across the solution.
- Web:
- A Blazor App project built with ASP.NET Core, implementing default .NET Aspire service configurations. It depends on ServiceDefaults for shared settings.
Let’s see Solution Explorer after creating the project.
Solution Explorer

We have created a solution, so let’s begin by adding MySQL to the project.
In this demo, we are going to configure the MySQL database and PhpMyAdmin.
What is phpMyAdmin?
phpMyAdmin is a free and open-source administration tool for MySQL and MariaDB. As a portable web application written primarily in PHP, it has become one of the most popular MySQL administration tools, especially for web hosting services.
Adding MySQL to App Host Project
In the App Host Project, we are going to Install the package Aspire.Hosting.MySql.

View after Adding Aspire.Hosting.MySql NuGet packages to the project.

After installation, we need to add resources to the Program.cs class of AppHost project.
Adding MySQL Services to AppHost in Program.cs
In program.cs we are going to add MySQL with various options for persisting data. We are going to store data in the container. If we don’t use this option, we will lose data as the container restarts.
var builder = DistributedApplication.CreateBuilder(args);

var cache = builder.AddRedis("cache");

// MySQL Database With PhpMyAdmin
var mysql = builder.AddMySql("MySQLDB")
    .WithDataVolume()
    .WithPhpMyAdmin();

// MySQL Database
var mysqldb = mysql

    .AddDatabase("UserDatabase");

var apiService = builder.AddProject<Projects.AspireApp4_ApiService>("apiservice")
    .WithReference(mysqldb)
    .WaitFor(mysqldb);
Various options to persist database.
- Adding WithDataVolume
- Adding WithDataBindMount
- Adding PhpmyAdmin
Adding WithDataVolume
The data volume is used to persist the MySQL server data outside the lifecycle of its container. The data volume is mounted at the /var/lib/mysql/data path in the MySQL server container and when a name parameter isn’t provided, the name is generated at random.
var builder = DistributedApplication.CreateBuilder(args);

var cache = builder.AddRedis("cache");

// MySQL Database With PhpMyAdmin
var mysql = builder.AddMySql("MySQLDB")
    .WithDataVolume()
    .WithPhpMyAdmin();
Adding WithDataBindMount
Data bind mounts rely on the host machine’s filesystem to persist the MySQL data across container restarts. The data-bind mount is mounted at the C:\MySql\Data on Windows (or /MySql/Data on Unix) path on the host machine in the MySQL container.
var builder = DistributedApplication.CreateBuilder(args);

var cache = builder.AddRedis("cache");

// MySQL Database With PhpMyAdmin
var mysql = builder.AddMySql("MySQLDB")
    .WithDataBindMount(source: @"C:\MySql\Data", isReadOnly: false)
    .WithPhpMyAdmin();
Adding PhpMyAdmin
Adds a phpMyAdmin administration and development platform for MySql to the application model.
phpMyAdmin is a free and open-source administration tool for MySQL and MariaDB. As a portable web application written primarily in PHP, it has become one of the most popular MySQL administration tools, especially for web hosting services.
var builder = DistributedApplication.CreateBuilder(args);

var cache = builder.AddRedis("cache");

// MySQL Database With PhpMyAdmin
var mysql = builder.AddMySql("MySQLDB")
    .WithDataVolume()
    .WithPhpMyAdmin();
After Completing with App Host project Configuration let’s move to API Service Project.
Installing Packages in API Service Project.
Adding Aspire.Pomelo.EntityFrameworkCore.MySql NuGet package in API Service Project. We are going to use this package for performing crud operations using entity framework core connecting MySQL database.

Next, we will integrate Swagger into this project to enhance our API documentation.
Adding Swashbuckle.AspNetCore.SwaggerGen NuGet package.

Adding Swashbuckle.AspNetCore.SwaggerUI NuGet package.

After adding the All NuGet package to the Project.

Adding Model to API Service Project.

Product Model
using System.ComponentModel.DataAnnotations;
using System.ComponentModel.DataAnnotations.Schema;

namespace AspireApp4.ApiService.Models;

[Table("Product")]
public class Product
{
    // Add properties here
    [Key]
    public int Id { get; set; }
    public string Name { get; set; }
    public decimal Price { get; set; }
    public string Description { get; set; }
}
Creating Database Context Class.
We are going to use Entity Framework core for inserting data into MySQL Database. For using entity framework core, we need to create a class which should inherit the Database context class.

Adding Class with name DataDbContext which is inheriting from DbContext class.
using AspireApp4.ApiService.Models;
using Microsoft.EntityFrameworkCore;
namespace AspireApp4.ApiService.Data;

public class DataDbContext : DbContext
{
    // Define your constructor here
    public DataDbContext(DbContextOptions<DataDbContext> options) : base(options) { }

    // Define your DbSets (tables) here
    public DbSet<Product> Products { get; set; }

}
After adding the DataDbContext class next we are going to Register it in Program.cs class as shown below. Where UserDatabase is a connection name.
// MY SQL Connection
builder.AddMySqlDbContext<DataDbContext>("UserDatabase");
After Registering MySQL database context
using AspireApp4.ApiService.Data;

var builder = WebApplication.CreateBuilder(args);

// Add service defaults & Aspire client integrations.
builder.AddServiceDefaults();

// Add services to the container.
builder.Services.AddProblemDetails();

// MY SQL Connection
builder.AddMySqlDbContext<DataDbContext>("UserDatabase");

var app = builder.Build();

// Configure the HTTP request pipeline.
app.UseExceptionHandler();

app.MapDefaultEndpoints();

app.Run();
After Registering AddMySqlDbContext next we are going to Add API Controller.
Adding API Controller

Added Empty API Controller
using Microsoft.AspNetCore.Http;
using Microsoft.AspNetCore.Mvc;

namespace AspireApp4.ApiService
{
    [Route("api/[controller]")]
    [ApiController]
    public class ProductController : ControllerBase
    {
    }
}
After adding the API controller, the next step is to implement methods for inserting data into the MySQL Database and retrieving values from it.
To achieve this, we will use constructor injection to obtain an instance of the DataDbContext Class.
API Controller Code Snippet
using AspireApp4.ApiService.Data;
using AspireApp4.ApiService.Models;
using Microsoft.AspNetCore.Http;
using Microsoft.AspNetCore.Mvc;
using Microsoft.EntityFrameworkCore;

namespace AspireApp4.ApiService
{
    [Route("api/[controller]")]
    [ApiController]
    public class ProductController : ControllerBase
    {
        private readonly DataDbContext _context;

        /// <summary>
        ///
        /// </summary>
        /// <param name="context"></param>
        public ProductController(DataDbContext context)
        {
            _context = context;
        }

        [HttpGet]
        public async Task<IActionResult> GetProducts()
        {
            var listodEmployees = await _context.Products.ToListAsync();
            return Ok(listodEmployees);
        }

        [HttpPost]
        public async Task<bool> AddProduct([FromBody] Product products)
        {
            try
            {
                await _context.Products.AddAsync(products);
                await _context.SaveChangesAsync();
            }
            catch (Exception e)
            {
                throw;
            }
            return true;
        }

    }
}
After Adding the Controller we are going to register the Service in the Program.cs class.
Adding Services to Program.cs class of API Service
We have Added Swagger, DBContext and Controller we need to Add these services to the program.cs.
using AspireApp4.ApiService.Data;

var builder = WebApplication.CreateBuilder(args);

// Add service defaults & Aspire client integrations.
builder.AddServiceDefaults();

// Add API Documentation
builder.Services.AddSwaggerGen();

// Add controllers services
builder.Services.AddControllers();

// Add services to the container.
builder.Services.AddProblemDetails();
Program.cs of AspireApp4.ApiService
using AspireApp4.ApiService.Data;

var builder = WebApplication.CreateBuilder(args);

// Add service defaults & Aspire client integrations.
builder.AddServiceDefaults();

// Add API Documentation
builder.Services.AddSwaggerGen();

// Add controllers services
builder.Services.AddControllers();

// Add services to the container.
builder.Services.AddProblemDetails();

// MY SQL Connection
builder.AddMySqlDbContext<DataDbContext>("UserDatabase");

var app = builder.Build();

app.MapControllers();

app.UseSwagger();

app.UseSwaggerUI();

// Configure the HTTP request pipeline.
app.UseExceptionHandler();

app.MapDefaultEndpoints();

app.Run();
After completing the integration with the API Service, we can now run the application for the first time.
This is the Dashboard for Aspire project where you will see all applications which are running.
Aspire Dashboard

The application runs in the docker container.

Creating Database Using PhpMyAdmin.
For opening the UI of PhpMyAdmin click on Container: MySQLDB-phpmyadmin Endpoints.

After clicking on it you will see PhpMyAdmin Dashboard.
PhpMyAdmin Dashboard

Creating Database.

Creating Table
API Documentation
Call API Service for inserting data.

To view the inserted data, we can utilize PhpMyAdmin.
Call API Service for Reading data.

Referenced From: Microsoft Learn – ASP.NET Core Inspire Series
Conclusion
Integrating MySQL with .NET Aspire doesn’t have to be a daunting task. With the right guide and best practices, you can create powerful, efficient, and scalable applications that meet modern development standards.
If you haven’t already, dive into the guide and start building seamless database integrations today. The tools and tips shared will not only save you time but also help you overcome common challenges with ease.
Let’s continue to learn, innovate, and share knowledge as we grow in this ever-evolving tech landscape. 🌟
GitHub Link:- https://github.com/saineshwar/Aspire_MySQL