How to Set up AutoMapper in ASP.NET Core 3.0
AutoMapper is an object-object mapper library
In Realtime application we assign values from one object to another object in many places such as mapping View Model to Model in controller similar way we do mapping again for showing values on Views by getting an object from the database back assigning to ViewModel.
In future, if we add a new property again to class, then the same assignment needs to do at all place where are doing object to object mapping right.
To overcome this object to object mapping, again and again, we can use AutoMapper.
Let’s start with creating an application.
Creating ASP.NET Core Application

Next, we are going to set Project Name WebAutoMapperDemo and location, and in last part, we are going to choose .Net Core framework and ASP.NET Core Version 3.1 as the framework for application and few advance settings for such as configuring https and enabling docker we are not going to enable docker settings for this project.

Now finally click on create button to create a project.
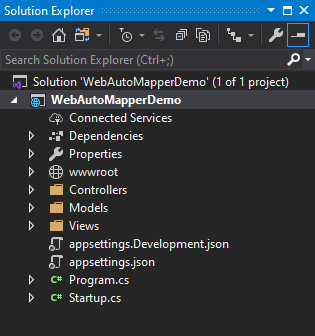
Project structure
The project structure generated according to the configuration.
After creating project next, we are going to install AutoMapper Extension from NuGet Package.
Installing AutoMapper.Extensions.Microsoft.DependencyInjection from NuGet Package
For installing AutoMapper right click on project select Manage NuGet Packages and then search AutoMapper.Extensions.Microsoft.DependencyInjection and click on the install button.

After adding package next, we are going to add 3 Classes in Models folder to doing Mapping.
Adding Class Customer
namespace WebApplication5.Models
{
    public class Customer
    {
        public int CustomerId { get; set; }
        public string CompanyName { get; set; }
        public string FirstName { get; set; }
        public string MiddleName { get; set; }
        public string LastName { get; set; }
        public string Address { get; set; }
        public string Phone { get; set; }
        public string Country { get; set; }
        public string City { get; set; }
        public string Pincode { get; set; }
    }
}
Adding Class CustomerViewModel
namespace WebAutoMapperDemo.Models
{
    public class CustomerViewModel
    {
        public int CustomerId { get; set; }
        public string CustomerFirstName { get; set; }
        public string CustomerPhone { get; set; }
        public string CustomerCountry { get; set; }
        public string CustomerCity { get; set; }
        public string CustomerPincode { get; set; }
    }
}
Adding Class ShippingDetails
namespace WebApplication5.Models
{
    public class ShippingDetails
    {
        public int ShipperId { get; set; }
        public int CustomerId { get; set; }
        public string CompanyName { get; set; }
        public string FullName { get; set; }
        public string Address { get; set; }
        public string Phone { get; set; }
        public string Country { get; set; }
        public string City { get; set; }
        public string Pincode { get; set; }
    }
}
Folder Structure after adding classes
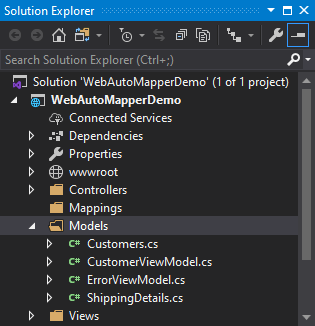
After adding classes for doing mapping next, we are going to create a Folder in Solution to keep Mappings Configuration with Name “Mappings” here we are going to store all profiles.

Note: – Using profiles is an excellent way to organize your mapping configurations.
After adding Mapping folder, next, we are going to add a class in Mapping folder with Name “CustomerProfile“, and CustomerProfile class will inherit Profile Class.
Next, we are going to add all configuration in the constructor of CustomerProfile class.
CustomerProfile will be to use to store all customer-related mappings in it. Similar way, you can create a different profile for a separate module.
Creating customer profiles Class
We are going to create Profile for doing that we are going to add a class with name CustomerProfile this class will inherit Profile class. We are going to write mapping in the constructor of CustomerProfile class.

using AutoMapper;
using WebAutoMapperDemo.Models;

namespace WebAutoMapperDemo.Mappings
{
    public class CustomerProfile : Profile
    {
        public CustomerProfile()
        {
            CreateMap<Customer, ShippingDetails>()
                .ForMember(dest =>
                        dest.FullName,
                    opt => opt.MapFrom(src => src.FirstName + " " + src.MiddleName + " " + src.LastName));
        }
    }
}
If you see above CodeSnippet we have not wrote any mapping for rest of properties just wrote mapping for FullName because here we are concating Firstname, LastName and MiddleName to create FullName. And rest of the properties have Similar property name and datatype which gets mapped automatically.
For example:- (ShippingDetails.CompanyName = Customer. CompanyName) both names are same and datatypes we don’t require to right Mapping for it.
After creating CustomerProfile class and adding Mapping of Customer and ShippingDetails next we are going to register AutoMapper Service in Startup class.
Register a service in Startup “ConfigureServices” method in Startup.cs Class
Here we are going to register auto mapper service in ConfigureServices method.
This Service scans for AutoMapper classes and registers the configuration, mapping, and extensions with the service collection.
public void ConfigureServices(IServiceCollection services)
{
    services.AddControllersWithViews();
    services.AddAutoMapper(typeof(Startup).Assembly);
}
After calling AddAutoMapper you can resolve a Mapper instance from a scoped service provider, or as a dependency.
After registering service next, we are going to add Controller with name DemoController.
using Microsoft.AspNetCore.Mvc;

namespace WebAutoMapperDemo.Controllers
{
    public class DemoController : Controller
    {
        public IActionResult Index()
        {
            return View();
        }
    }
}
After adding the controller, next, we are going to inject the mapper object into the controller.

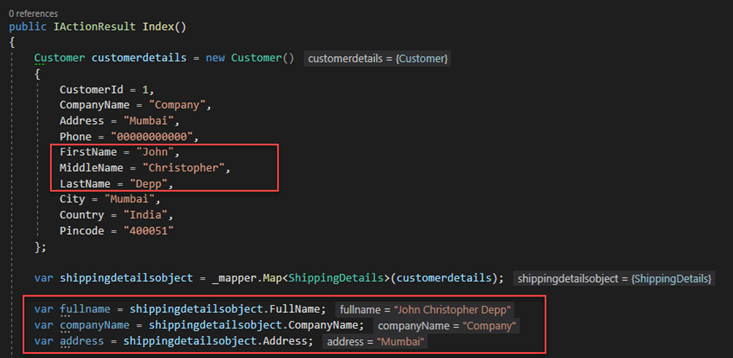
Next, we are going to create a Customer (source) object and pass as a source to Map method, and in-destination object we are going to add the ShippingDetails (Destination), class.
TDestination Map<TDestination>(object source);
Code Snippet
using Microsoft.AspNetCore.Mvc;
using WebAutoMapperDemo.Models;

namespace WebAutoMapperDemo.Controllers
{
    public class DemoController : Controller
    {
        private readonly IMapper _mapper;
        public DemoController(IMapper mapper)
        {
            _mapper = mapper;
        }

        public IActionResult Index()
        {
            Customer customerdetails = new Customer()
            {
                CustomerId = 1,
                CompanyName = "Company",
                Address = "Mumbai",
                Phone = "00000000000",
                FirstName = "John",
                MiddleName = "Christopher",
                LastName = "Depp",
                City = "Mumbai",
                Country = "India",
                Pincode = "400051"
            };

            var shippingdetailsobject = _mapper.Map<ShippingDetails>(customerdetails);
            var fullname = shippingdetailsobject.FullName;
            var companyName = shippingdetailsobject.CompanyName;
            var address = shippingdetailsobject.Address;

            return View();
        }
    }
}
Output
Next, we are going to map a list of shipping details to list of customers.
AutoMapper mapping list of objects
For doing Mapping, we must have MappingProfile we already have CustomerProfile which contains a mapping of shippingdetails and customer which we are going to use for mapping list.
If you see below code snippet, for this example we don’t require to create new mapping because we already have a mapping of shippingdetails and customer in CustomerProfile Class.
In source part, we are going to add a list of customers, and in the destination, we are going add a list of shippingdetails.
TDestination Map<TDestination>(object source);
Code Snippet
using System.Collections.Generic;
using AutoMapper;
using Microsoft.AspNetCore.Mvc;
using WebAutoMapperDemo.Models;

namespace WebAutoMapperDemo.Controllers
{
    public class DemoController : Controller
    {
        private readonly IMapper _mapper;
        public DemoController(IMapper mapper)
        {
            _mapper = mapper;
        }

        public IActionResult Index()
        {
            List<Customer> listofcustomers = new List<Customer>()
            {
                new Customer(){
                    Address = "Mumbai",
                    Phone = "00000000000",
                    FirstName = "John",
                    MiddleName = "Christopher",
                    LastName = "Depp",
                    City = "Mumbai",
                    Country = "India",
                    CustomerId = 1,
                    CompanyName = "Company",
                    Pincode = "400051"
                }
            };
            var listofmappedShippingDetails = _mapper.Map<List<ShippingDetails>>(listofcustomers);
            return View();
        }
    }
}
Output

Mapping Individual Members
If we have different property Name in source and destination class then we need to do individual Mapping.
For this example, we going to use Customer and CustomerViewModel classes both classes have different property Names.
Adding New Mapping in CustomerProfile Class
CreateMap<Customer, CustomerViewModel>().ForMember(dest =>
                        dest.CustomerFirstName,
                    opt => opt.MapFrom(src => src.FirstName))
                .ForMember(dest =>
                    dest.CustomerCountry, opt => opt.MapFrom(src => src.Country))
                .ForMember(dest =>
                    dest.CustomerCity, opt => opt.MapFrom(src => src.City))
                .ForMember(dest =>
                    dest.CustomerPincode, opt => opt.MapFrom(src => src.Pincode))
                .ForMember(dest =>
                    dest.CustomerPhone, opt => opt.MapFrom(src => src.Phone));
If you see above Code Snippet we have used ForMember Method to Customize individual members.
For Example:- We are Mapping property FirstName to CustomerFirstName, Country to CustomerCountry same way we are mapping other properties.
Updated Codesnippet of CustomerProfile Class
using AutoMapper;
using WebAutoMapperDemo.Models;

namespace WebAutoMapperDemo.Mappings
{
    public class CustomerProfile : Profile
    {
        public CustomerProfile()
        {
            CreateMap<Customer, ShippingDetails>()
                .ForMember(dest =>
                        dest.FullName,
                    opt => opt.MapFrom(src => src.FirstName + " " + src.MiddleName + " " + src.LastName));

            CreateMap<Customer, CustomerViewModel>().ForMember(dest =>
                        dest.CustomerFirstName,
                    opt => opt.MapFrom(src => src.FirstName))
                .ForMember(dest =>
                    dest.CustomerCountry, opt => opt.MapFrom(src => src.Country))
                .ForMember(dest =>
                    dest.CustomerCity, opt => opt.MapFrom(src => src.City))
                .ForMember(dest =>
                    dest.CustomerPincode, opt => opt.MapFrom(src => src.Pincode))
                .ForMember(dest =>
                    dest.CustomerPhone, opt => opt.MapFrom(src => src.Phone));
        }
    }
}
CodeSnippet
using System.Collections.Generic;
using AutoMapper;
using Microsoft.AspNetCore.Mvc;
using WebAutoMapperDemo.Models;

namespace WebAutoMapperDemo.Controllers
{
    public class DemoController : Controller
    {
        private readonly IMapper _mapper;
        public DemoController(IMapper mapper)
        {
            _mapper = mapper;
        }

        public IActionResult Index()
        {
            Customer customerdetails = new Customer()
            {
                CustomerId = 1,
                CompanyName = "Company",
                Address = "Mumbai",
                Phone = "00000000000",
                FirstName = "John",
                MiddleName = "Christopher",
                LastName = "Depp",
                City = "Mumbai",
                Country = "India",
                Pincode = "400051"
            };

            var viewmodel = _mapper.Map<CustomerViewModel>(customerdetails);
            var firstName = viewmodel.CustomerFirstName;
            var country = viewmodel.CustomerCountry;
            var city = viewmodel.CustomerCity;

            return View();
        }
    }
}
Output
