ASP.NET Core Identity is read to use simple membership system which evolved over the years, which include features such as Registering User, login, forgot password, change password, assign roles, Role-based Authorization, Policy-based Authorization, Claims Based Authorization. It also supported external login providers include Facebook, Google, Microsoft Account, and Twitter. ASP.NET Core Identity also has readymade UI; you can customise it according to your requirement.
In this article, we are going to learn how to set up ASP.NET CORE identity in simple steps, and the upcoming article will go in details about how to Customize ASP.NET CORE identity.
- Creating ASP.NET Core Application
- Changing Authentication
- Project structure
- Configure Connection String
- Migration Description
- Applying this migration to the database
- Home Page
- Registering New User
- Confirming User Account
- Login
We are going to create ASP.NET Core Web Application for that we are going to choose ASP.NET Core Web Application template.
Creating ASP.NET Core Application

After choosing template Next, we are going to enter Project Name DemoWebIdentity in Project Name box, and along with that we can configure Location of project and Solution name and Then, click on Create button.
After clicking on create button a new dialog will appear here, we are going to choose .Net Core framework and ASP.NET Core Version 3.0 as the framework for the application, and in advance settings, we are not going to enable docker settings for this project.
For working with ASP.NET Core Identity, we are going to change the Authentication of project.

Changing Authentication
When you click on change link a new dialog popup which show various Authentication methods.
- No Authentication
- Individual User Accounts (Authenticate User in membership database)
- Work or School Accounts (Authenticate User using Azure Active Directory)
- Windows Authentication (Authenticate User using intranet environment)

We are going to select Individual User Accounts and in dropdown select store user account in-app and then click OK button.

Finally, click on Create button to Create project.
Project structure
The project structure generated according to the configuration.

Configure Connection String
In the next part, we are going to Configure connection string in appsettings.json file. The default connection string which is available connects to SQL Server Express LocalDB. If you are using SQL Server Express, then you do not require to change connection.
Note: – Microsoft SQL Server Express LocalDB is a feature of SQL Server Express targeted to developers. It is available on SQL Server Express with Advanced Services.
Default Connection String
{
  "ConnectionStrings": {
    "DefaultConnection": "Server=(localdb)\\mssqllocaldb;Database=aspnet-DemoWebIdentity-07FF5D8C-C870-433D-BA82-D197481A6D92;Trusted_Connection=True;MultipleActiveResultSets=true"
  },
  "Logging": {
    "LogLevel": {
      "Default": "Information",
      "Microsoft": "Warning",
      "Microsoft.Hosting.Lifetime": "Information"
    }
  },
  "AllowedHosts": "*"
}
If you want to connect to LocalDB from SQL Server Management Studio, then enter ‘(localdb)\MSSQLLocalDB‘ as Server Name and Select Authentication Type as Windows Authentication.

For this project, we are going to use SQL Server Authentication for doing that we are going to make a change in the Connection string as shown below.
Connection String
{
  "ConnectionStrings": {
    "DefaultConnection": "Data Source=DESKTOP-DUM6D15; initial catalog=DemoIdentity; user id=sa; password=####;Trusted_Connection=True;MultipleActiveResultSets=true"
  },
  "Logging": {
    "LogLevel": {
      "Default": "Information",
      "Microsoft": "Warning",
      "Microsoft.Hosting.Lifetime": "Information"
    }
  },
  "AllowedHosts": "*"
}
After Setting Connection String next, we are going to add Adding a Migration.
Migration Description
Migration feature allows you to make a change in Model and then this model changes can be added to your database, which allows your model and database to be in sync.
If you see we already have Migrations directory in Data Folder.
The code in Migration files will create Identity tables in the database such as AspNetUsers, AspNetRoles, AspNetUserRoles etc.

Migrations directory contains 2 files
- 00000000000000_CreateIdentitySchema.cs
–The main migrations file. Contains the operations necessary to apply the
migration (in Up()) and to revert it (in Down()). - ApplicationDbContextModelSnapshot.cs–A
snapshot of your current model. Used to determine what changed when adding the
next migration.
We already have Migration Created We need to Run update-database command to apply the migration to the database.
Applying this migration to the database
In this part, we already have Migration we are going to apply this migration to the database.
For doing that we are going to run command ‘Update-Database‘ from the Package Manager Console.
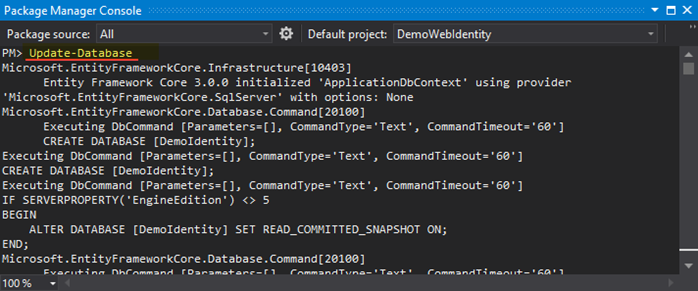
Update-Database command to create a database and schema which is there in the main migrations file.
Now opens your SQL Management studio to check created database.
Database Created after applying Migration

Now we have a database and scheme which is required for Using ASP.NET Core Identity.
Next step is to run the application and check ASP.NET Core Identity Features one by one.
Home Page

Registering New User
Registering a User in an application.

Confirming User Account
After registering, it will show you register confirmation page for confirming account which you have used while registering because the application currently is not configured to send email to registered user.
You can still confirm the account by click on the link.

After registering User, you will see user details are stored in ‘AspNetUsers‘ table as shown below.
Table View

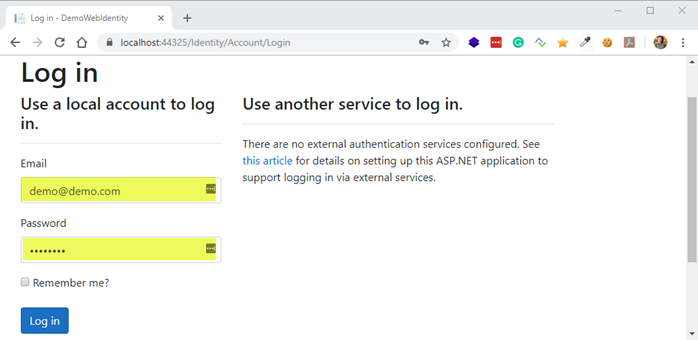
Login
Now let’s login with Credentials and check we have created user properly.
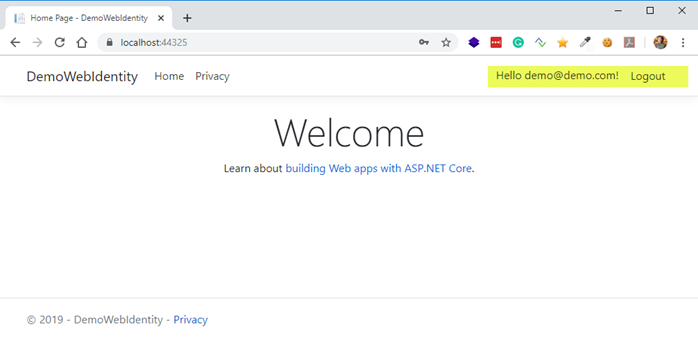
Below is a snapshot of the page after login.
We have now learned how to setup ASP.NET Core identity in simple steps.