In this article, we will explore the Agent Admin role in the VueTicket application, also known as the Agent Manager. Understanding the permissions and capabilities granted to this role is essential for managing agents effectively, overseeing ticket workflows, and maintaining proper system security. We’ll take a closer look at the specific responsibilities, access levels, and control features provided to the Agent Admin, helping you fully understand their place within the support system.


Let’s begin with Login Page.

Agent Admin Dashboard
After logging into the Application, you are redirected to the dashboard page where you can see all tickets status in one View.

Agent admin can see all tickets assigned to agents inside his department.
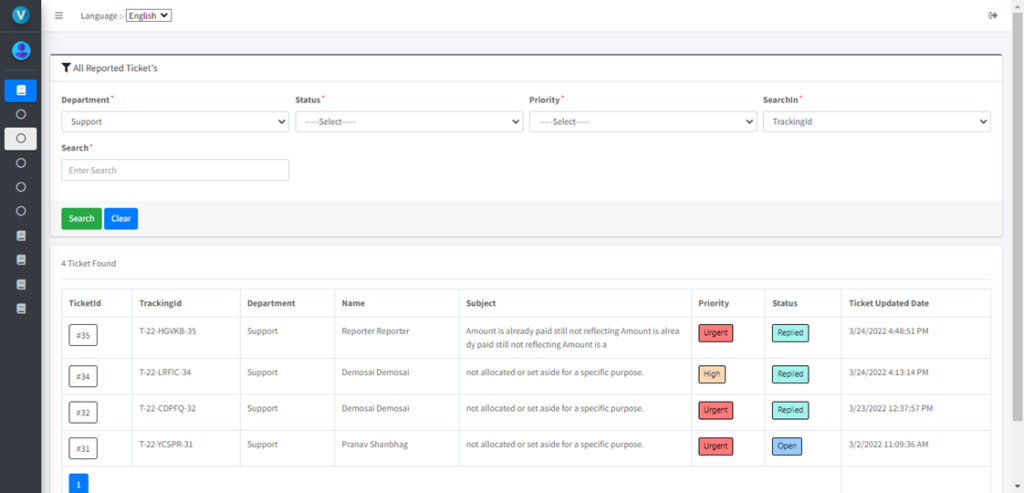
All Assigned Ticket’s
A list of tickets will be shown here along with search features.

To see ticket detail view just click on Ticket id from the grid.
Ticket Detail View

In this view, you can see detailed information about tickets and quick options to reply to the ticket.
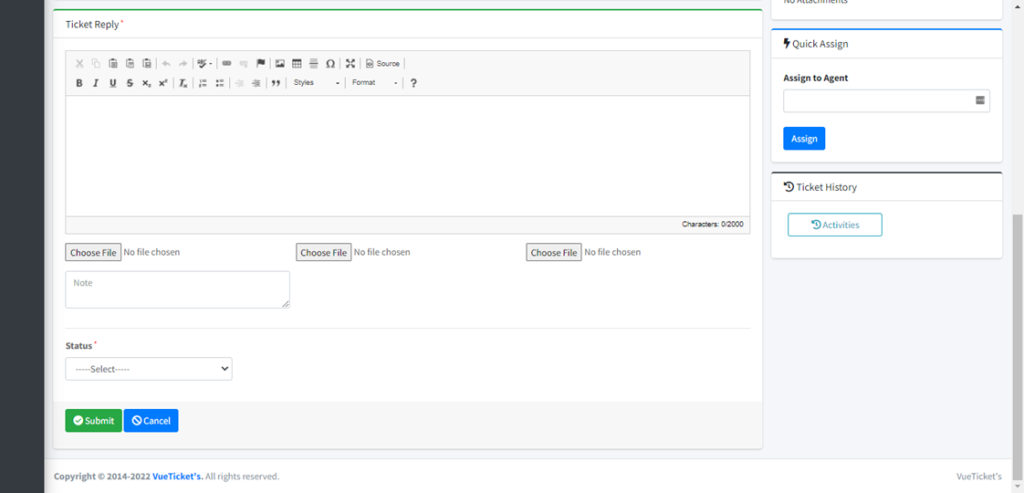
First panel, you can ticket details along with other information related to the ticket.
In add ticket reply panel agent can reply on the ticket.
If Agent wants to give an internal note on the ticket, they can use the “Note” text area which can be viewed by agents and agent admin.
Also, in reply agent can attach attachments.
We have a status dropdown that we need to choose while we reply to the ticket.
Example Status: – “Resolved”, “InProgress”, “On Hold”, “Reply”.
Now to the right side of the ticket view, you can see different panels.
“Quick information” in this panel you can see ticket tracking id, name of user-created ticket and name of assigned ticket person along with created on the date.
“Change Priority “in this panel you can change Priority of Main Ticket.
“Attachments” in this panel you can see all attachments of tickets attached by the User.
“Quick Assign” in this panel you can assign the ticket to a different agent and agent admin in the group.
“Ticket History” in this part you can track the entire history of the ticket.
Replying on Ticket
For replying to the ticket agent will enter a message in Editor and choose status as resolved for demo.

Confirmation is shown before replying to the ticket.


Ticket History
After clicking on the ticket history button, it will show all details of ticket activity.

Create Users
If Agent Admin wants to create a ticket, then need to create User first, it does not exist else, he can choose from existing users to create a ticket.
After Agent Admin creates, the new user will get the user’s name which is system generated in alert which he can share to User on behalf which he had created ticket. Else Agent Admin can also see a list of all created users where he can search newly created Users by him.

All Users

Create Ticket feature
An agent admin can create a ticket for existing users or create a new user and then while agent admin is creating ticket agent admin can select the name of User which he has created or already exists.
After selecting a name, the agent admin needs to fill in necessary details and choose department and priority and enter your query in the Message Editor, attach a document if you want to send.

After creating a ticket, this ticket will be auto-assign to the Agent according to the department chosen while creating a ticket.
All Created Tickets by Agent Admin
All Closed Tickets
In this view agent, the admin can see all closed tickets by him and all agents in the department.

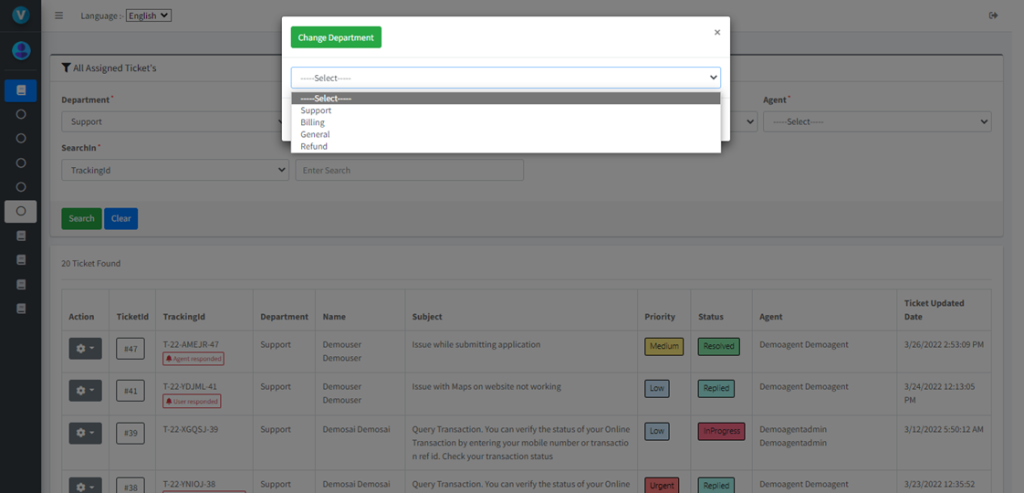
Transfer Tickets
In this part, the agent admin can transfer the ticket to another department.

After selecting an action for a single ticket, you will get an option to transfer ticker which will show a popup and a list of departments from this list choose which department you want to assign this ticket.
Delete Ticket
In some cases, if you found the ticket is junk and want to delete this agent admin has the right to do it. Just choosing a single ticket and clicking on Delete Option will ask for confirmation and after confirmation, it will be deleted.


Restore ticket
If the ticket is deleted in some cases you want to undo it then you have an option to restore it.

Just choosing a single ticket and clicking on Restore Option will ask for confirmation and after confirmation, it will be restored.

My Team
In my team, you will be able to see your entire team which is working on it.

Knowledgebase
An Agent Admin can add a new knowledge base article.

All Created Knowledgebase
All Created Knowledgebase are shown in this view.

Reports
Agent Admin has a report feature. He can view the report of his department. Take an example Agent Admin with report department “support” can see all Agents details of department “support”.
There are different types of reports an agent admin can view.
- Agent Wise Ticket Status Report
- Department Wise Ticket Status Report
- Ticket Overdue Status Report
- Ticket Overdue User Wise Report
- Ticket Escalation Report
- Ticket Deleted Report
- Priority Wise Ticket Status Report
- Agent Detail Report
- User Wise Check-in Checkout Report

Sample Report

GitHub Link :- https://github.com/saineshwar/VueTicket
Introduction Link :- https://tutexchange.com/introduction-to-vuetickets-a-ticketing-application/