

In this article, we will learn how to integrate RabbitMQ with .Net Aspire. As you know, .Net Aspire is used to build cloud-native applications.


Integrating .NET with PostgreSQL and Redis: A Quick Guide
If you are working on .NET applications and looking to integrate with PostgreSQL and Redis, here are two useful resources that can help you get started:
- How to Integrate .NET Aspire with PostgreSQL
This article provides a step-by-step guide to help you seamlessly integrate your .NET applications with PostgreSQL. It covers the key concepts, configuration steps, and sample code to ensure a smooth connection between .NET Aspire and PostgreSQL. - How to Integrate .NET Aspire with Redis
Redis is widely used for caching and message brokering. This guide walks you through integrating Redis with your .NET applications. It explains how to configure Redis, establish a connection, and leverage it effectively for enhanced performance in your .NET projects.
In this article, we cover:
- Create a .Net Aspire Starter App.
- Solution Explorer
- Adding Aspire.Hosting.RabbitMQ to App Host Project
- View after Adding Aspire.Hosting.RabbitMQ NuGet packages to the project.
- Adding RabbitMQ server resource with admin management plugin.
- RabbitMQ Admin Interface
- Adding Data Volume (To Persist Data in RabbitMQ)
- Adding WithDataBindMount (To Persist Data in RabbitMQ)
- Source code of AspireApp5.AppHost after adding WithDataBindMount
- Client Integration
- Adding Swashbuckle.AspNetCore.SwaggerGen NuGet package.
- Adding Swashbuckle.AspNetCore.SwaggerUI NuGet package.
- After adding the All NuGet package to the Project.
- Complete API Service Program.cs File.
- Adding Model to API Service Project.
- Adding API Controller.
- Added Empty API Controller
- Source code of ValuesController
- Adding Services to Program.cs class of API Service
- Aspire Dashboard
- Docker container
- Using Swagger for Insert and Reading Data from RabbitMQ
- Adding Message in RabbitMQ from API Service.
- RabbitMQ Management interface after Adding Message
- RabbitMQ Management interface after Reading Message
- Conclusion
What is RabbitMQ?
RabbitMQ is a popular open-source, cross-platform message broker that uses the AMQP protocol. It is built on Erlang. This is the same technology behind WhatsApp’s messaging. RabbitMQ enables seamless data exchange between applications. This is possible regardless of their programming language, such as .NET, Node.js, or Java.
Create a .Net Aspire Starter App.


After selecting the project, click the “Next” button to proceed.
A new dialogue will prompt you to configure your new project. Within this dialogue, you will be asked to provide a Solution Name and specify the location where the project should be saved.


After entering details, click the “Next” button to proceed.
A new dialogue will appear, prompting you to configure additional information related to the project, such as the framework, the .NET Aspire version, and the option to create a test project. For this demonstration, I will select .NET Aspire 9.0.

Click on the Create button to create an Aspire project.
Let’s see Solution Explorer after creating the project.
Solution Explorer


Let’s get started with Hosting integration.
In Hosting integration, we are going to Add the RabbitMQ NuGet Package to the App Host Project.
Adding Aspire.Hosting.RabbitMQ to App Host Project
After Adding Aspire.Hosting.RabbitMQ NuGet package to your app’s host project. This package provides the RabbitMQServer Resource type and its APIs for managing a RabbitMQ server.
From .Net CLI
dotnet add package Aspire.Hosting.RabbitMQ
From NuGet Package Manager


View after Adding Aspire.Hosting.RabbitMQ NuGet packages to the project.


After installation, we need to add resources to the Program.cs class of AppHost project.
Add a RabbitMQ server resource.
// Added RabbitMQ server resource
var rabbitmq = builder.AddRabbitMQ("messaging");
Code Snippet of AspireApp5.AppHost
var builder = DistributedApplication.CreateBuilder(args);

var cache = builder.AddRedis("cache");

// Added RabbitMQ server resource
var rabbitmq = builder.AddRabbitMQ("messaging");

var apiService = builder.AddProject<Projects.AspireApp5_ApiService>("apiservice")
    .WithReference(rabbitmq);

builder.AddProject<Projects.AspireApp5_Web>("webfrontend")
    .WithExternalHttpEndpoints()
    .WithReference(cache)
    .WaitFor(cache)
    .WithReference(apiService)
    .WaitFor(apiService);

builder.Build().Run();
Adding RabbitMQ server resource with admin management plugin.
One of the most needed things, if we are using RabbitMQ, is the Admin Management plugin.
Using Management Interface, we can see all metrics of RabbitMQ and how many Connections, Channels, Exchanges and Queues we have.
And also offers the functionality required to monitor, manage, and administer RabbitMQ nodes and clusters.


After clicking on messaging Endpoints it will open RabbitMQ Management Interface as shown below.
RabbitMQ Admin Interface


Now you will be thinking where should I get credentials to log in right? In Aspire you can see environment values directly from the dashboard Just click on them.

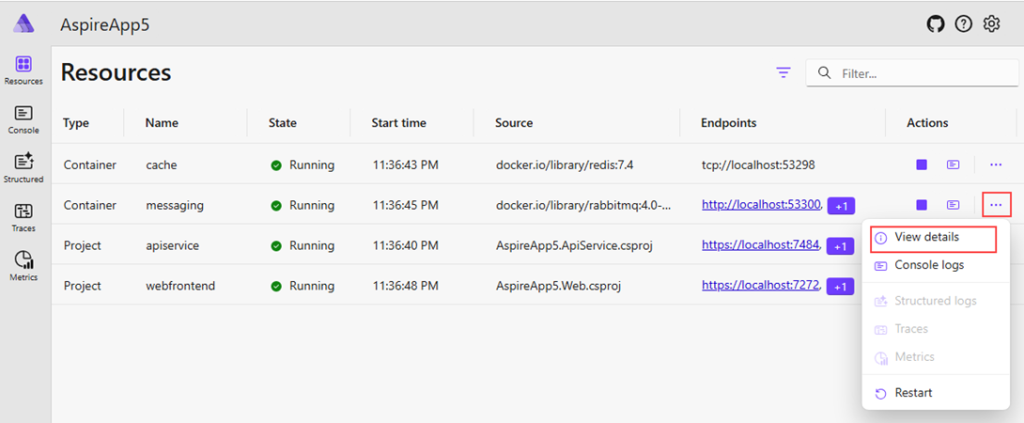
After clicking on View details, you will see a sidebar which will have options to view RabbitMQ Default Credentials.

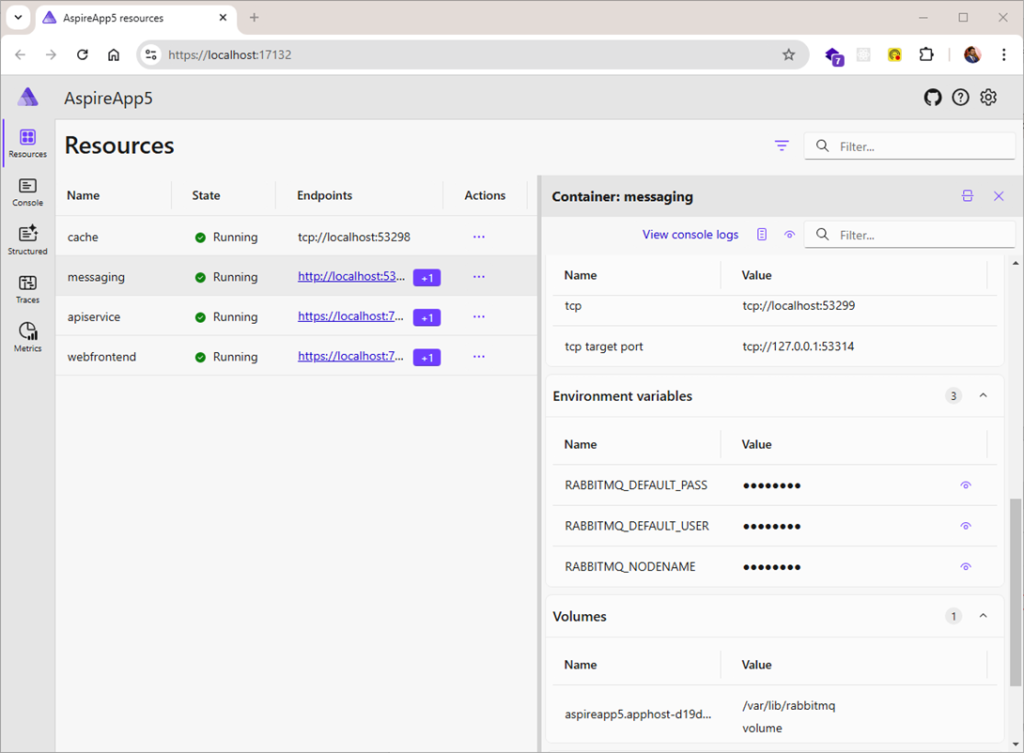
Click on the show password icon to view User and Password.


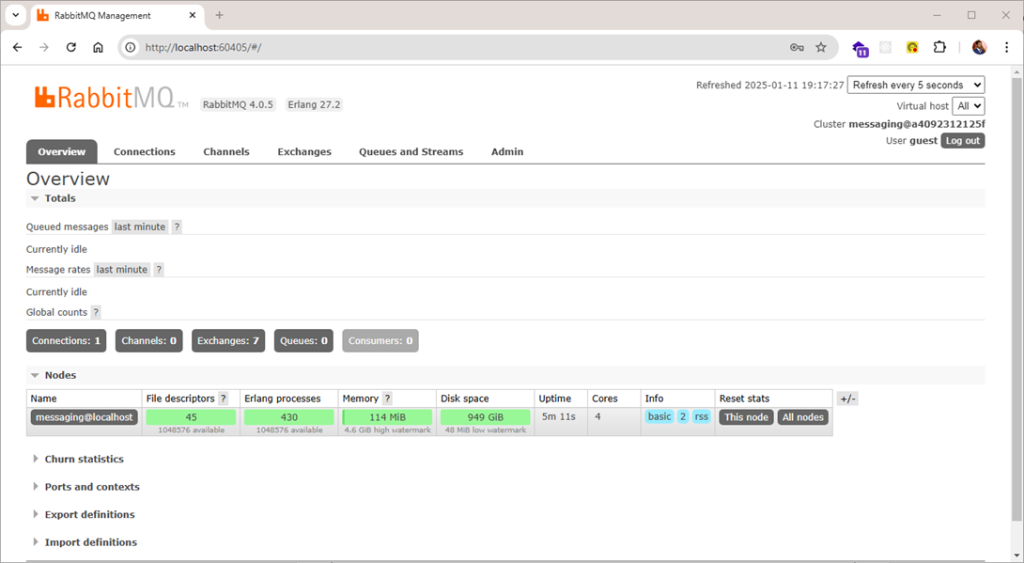
After clicking on the messaging endpoint (http://localhost:60405), it will open the RabbitMQ Admin Management interface.
In this Interface enter Username and Password to login.


After entering the password, you will view below RabbitMQ Management interface below.
From the RabbitMQ Management interface, you can monitor the entire RabbitMQ and see performance stats, Queued messages, and connections which are made by the application with RabbitMQ.
Also, you can create Exchange, queue, and publish data to test its working from the RabbitMQ Management interface.

Adding Data Volume (To Persist Data in RabbitMQ)
We need to add data volume because as this project runs on a container if we don’t have persistence storage then data will get lost as the container restarts.
A data volume is used to persist RabbitMQ server data outside the lifecycle of its container. This volume is mounted at /var/lib/rabbitmq in the RabbitMQ server container. If no name is provided, a random name is generated for the volume.
var rabbitmq = builder.AddRabbitMQ("messaging")
    .WithDataVolume(isReadOnly: false)
    .WithManagementPlugin();
Source code of AspireApp5.AppHost after adding WithDataVolume
var builder = DistributedApplication.CreateBuilder(args);

var cache = builder.AddRedis("cache");

// Added RabbitMQ server resource
var rabbitmq = builder.AddRabbitMQ("messaging")
    .WithDataVolume(isReadOnly: false)
    .WithManagementPlugin();

var apiService = builder.AddProject<Projects.AspireApp5_ApiService>("apiservice")
    .WithReference(rabbitmq);

builder.AddProject<Projects.AspireApp5_Web>("webfrontend")
    .WithExternalHttpEndpoints()
    .WithReference(cache)
    .WaitFor(cache)
    .WithReference(apiService)
    .WaitFor(apiService);

builder.Build().Run();
Adding WithDataBindMount (To Persist Data in RabbitMQ)
Data bind mounts use the host machine’s filesystem to persist RabbitMQ server data across container restarts. The data-bind mount is located at C:\RabbitMQ\Data on Windows or /RabbitMQ/Data on Unix systems. This path is mounted in the RabbitMQ server container.
// Added RabbitMQ server resource
var rabbitmq = builder.AddRabbitMQ("messaging")
        .WithDataBindMount(
            source: @"D:\RabbitMQ\RabbitMQData",
            isReadOnly: false)
    .WithManagementPlugin();
As we add WithDataBindMount Extension then it creates a folder in the local drive.


Source code of AspireApp5.AppHost after adding WithDataBindMount
var builder = DistributedApplication.CreateBuilder(args);

var cache = builder.AddRedis("cache");

// Added RabbitMQ server resource
var rabbitmq = builder.AddRabbitMQ("messaging")
        .WithDataBindMount(
            source: @"D:\RabbitMQ\RabbitMQData",
            isReadOnly: false)
    .WithManagementPlugin();

var apiService = builder.AddProject<Projects.AspireApp5_ApiService>("apiservice")
    .WithReference(rabbitmq);

builder.AddProject<Projects.AspireApp5_Web>("webfrontend")
    .WithExternalHttpEndpoints()
    .WithReference(cache)
    .WaitFor(cache)
    .WithReference(apiService)
    .WaitFor(apiService);

builder.Build().Run();
Till now we have done Server Configuration now let’s do Client Integration.
Client Integration
How to connect with RabbitMQ we need to Install Aspire.RabbitMQ.Client package in the client-consuming project.


Next, we will integrate Swagger into this project to enhance our API documentation.
Adding Swashbuckle.AspNetCore.SwaggerGen NuGet package.


Adding Swashbuckle.AspNetCore.SwaggerUI NuGet package.

After adding the All NuGet package to the Project.


After Adding the NuGet Package which is required next we are going to Register Service in APIService Program.cs Class.
As you see we have Added RabbitMQ Client with Connection Name “messaging” which is similar to what we have registered in the AppHost Project.
// Add API Documentation
builder.Services.AddSwaggerGen();

// Add controllers services
builder.Services.AddControllers();

builder.AddRabbitMQClient(connectionName: "messaging");

app.MapControllers();
app.UseSwagger();
app.UseSwaggerUI();
Complete API Service Program.cs File.
var builder = WebApplication.CreateBuilder(args);

// Add service defaults & Aspire client integrations.
builder.AddServiceDefaults();

// Add API Documentation
builder.Services.AddSwaggerGen();

// Add controllers services
builder.Services.AddControllers();

builder.AddRabbitMQClient(connectionName: "messaging");

// Add services to the container.
builder.Services.AddProblemDetails();

var app = builder.Build();

// Configure the HTTP request pipeline.
app.UseExceptionHandler();

app.MapControllers();
app.UseSwagger();
app.UseSwaggerUI();


app.MapDefaultEndpoints();

app.Run();
After Registering next we are going to add the required class to take input.
Adding Model to API Service Project.
We are going to add RequestMessage Class along with Message Property. It will be used as an input.
namespace AspireApp5.ApiService.Models;

public class RequestMessage
{
    public string Message { get; set; }
}

After adding the RequestMessage Model next we are going to Add the API Controller.
Adding API Controller.


Added Empty API Controller
using Microsoft.AspNetCore.Http;
using Microsoft.AspNetCore.Mvc;

namespace AspireApp5.ApiService
{
    [Route("api/[controller]")]
    [ApiController]
    public class ValuesController : ControllerBase
    {
    }
}
After adding the controller next, we are going to add IConnection Dependency injection in Constructor and add 2 methods one for post (adding data into RabbitMQ Queue) and another for reading data from RabbitMQ Queue.
This ValuesController provides API endpoints to send and receive messages using RabbitMQ. It allows services to communicate by adding messages to a queue named myAspireRabbit and retrieving them when needed. The RabbitMQ connection is injected into the controller to make it easy to manage and test.
The InsertMessage endpoint lets you send messages to the queue. It ensures the queue exists and stores messages in a reliable way so they won’t be lost even if RabbitMQ restarts. Messages are sent in UTF-8 format to ensure compatibility. The GetMessage endpoint retrieves a single message from the queue. If there are no messages, it returns a “not found” response, ensuring the system remains responsive.
Source code of ValuesController
using AspireApp5.ApiService.Models;
using Microsoft.AspNetCore.Http;
using Microsoft.AspNetCore.Mvc;
using RabbitMQ.Client;
using System.Text;

namespace AspireApp5.ApiService
{
    [Route("api/[controller]")]
    [ApiController]
    public class ValuesController : ControllerBase
    {
        private readonly IConnection _connection;
        /// <summary>
        ///
        /// </summary>
        /// <param name="connection"></param>
        public ValuesController(IConnection connection)
        {
            _connection = connection;
        }


        [HttpGet]
        public IActionResult GetMessage()
        {
            using var channel = _connection.CreateModel();

            // Try to get a single message from the queue (non-blocking)
            var result = channel.BasicGet(queue: "myAspireRabbit", autoAck: true);

            if (result != null)
            {
                var message = Encoding.UTF8.GetString(result.Body.ToArray());
                return Ok(new { Message = message });
            }
            else
            {
                return NotFound("No messages in the queue.");
            }
        }

        [HttpPost]
        public IActionResult InsertMessage([FromBody] RequestMessage requestMessage)
        {
            try
            {
                using var channel = _connection.CreateModel();
                channel.QueueDeclare(queue: "myAspireRabbit",
                    durable: true,
                    exclusive: false,
                    autoDelete: false,
                    arguments: null);

                var body = System.Text.Encoding.UTF8.GetBytes(requestMessage.Message);

                var properties = channel.CreateBasicProperties();
                properties.Persistent = true; // Makes the message durable

                channel.BasicPublish(exchange: "",
                    routingKey: "myAspireRabbit",
                    basicProperties: properties,
                    body: body);

                return Ok("Message published.");
            }
            catch (Exception e)
            {
                throw;
            }
        }

    }
}
Adding Services to Program.cs class of API Service
var builder = WebApplication.CreateBuilder(args);

// Add service defaults & Aspire client integrations.
builder.AddServiceDefaults();

// Add API Documentation
builder.Services.AddSwaggerGen();

// Add controllers services
builder.Services.AddControllers();

builder.AddRabbitMQClient(connectionName: "messaging");

// Add services to the container.
builder.Services.AddProblemDetails();

var app = builder.Build();

// Configure the HTTP request pipeline.
app.UseExceptionHandler();

app.MapControllers();
app.UseSwagger();
app.UseSwaggerUI();


app.MapDefaultEndpoints();

app.Run();
After completing the integration with the API Service, we can now run the application for the first time.
This is the Dashboard for Aspire project where you will see all applications which are running.
Aspire Dashboard


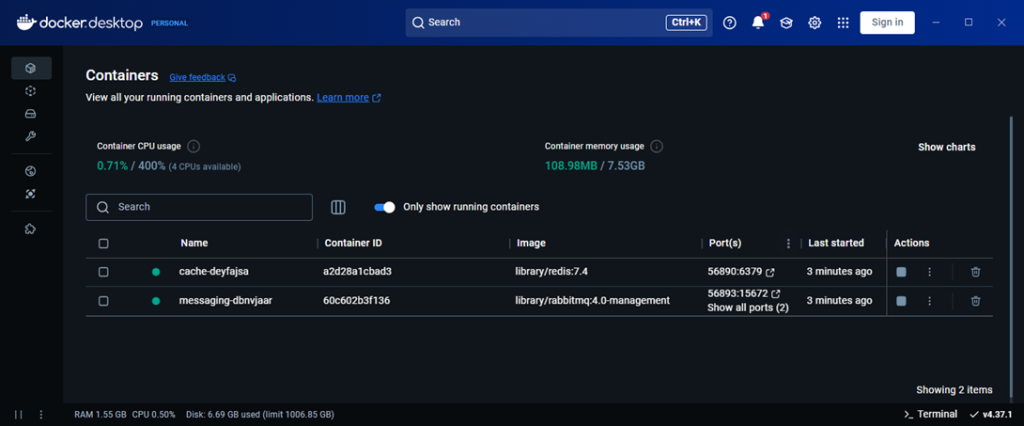
Docker container
The all application runs in the docker container.

Now let’s Access Swagger from URL (Name: apiservice).
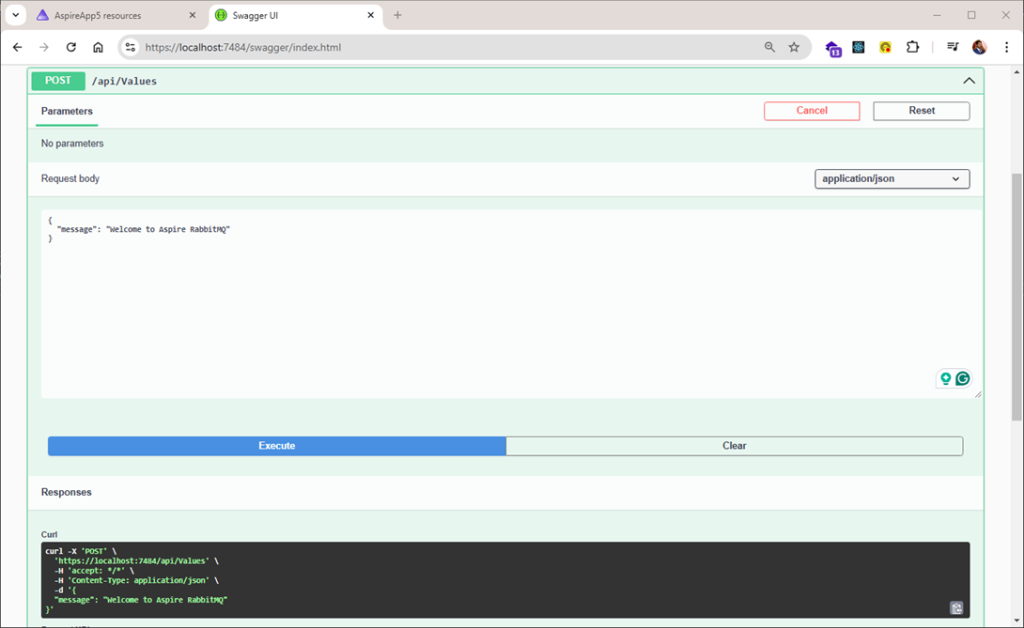
Using Swagger for Insert and Reading Data from RabbitMQ


Adding Message in RabbitMQ from API Service.

Let’s View the Message which we have Posted is it Added to myAspireRabbit Queue?
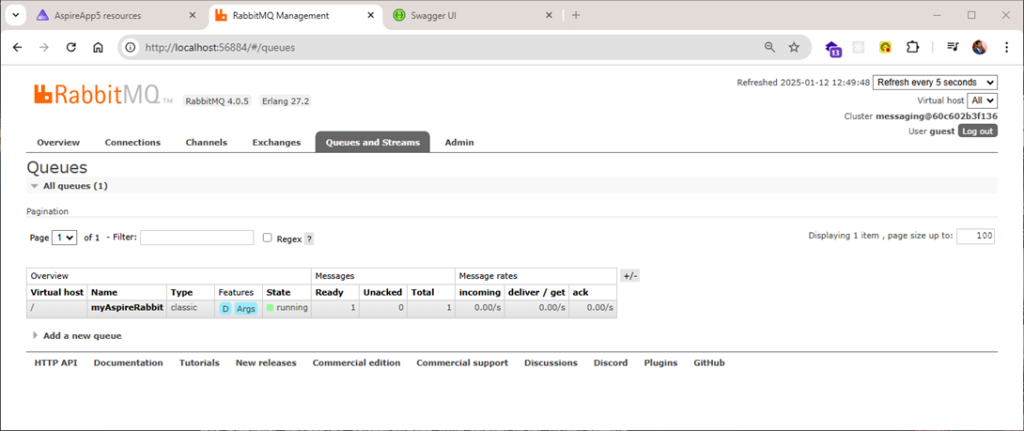
RabbitMQ Management interface after Adding Message
Ya, the Message we have posted is added to Queue which we have created myAspireRabbit. After inserting you can see ready and the Total count is 1.

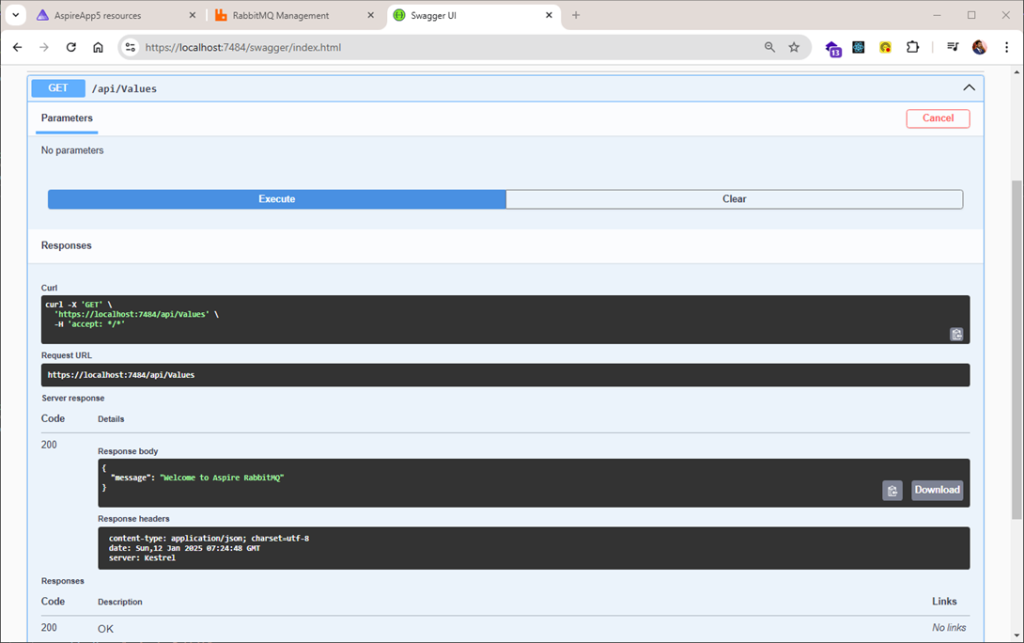
Now let’s try to read it using the Swagger API service Get Method which will call ValuesController Get Method.

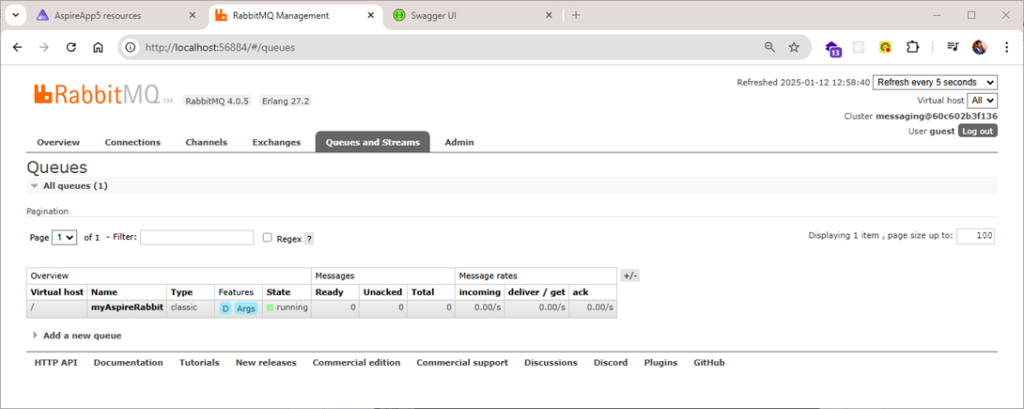
RabbitMQ Management interface after Reading Message
Referenced From: Microsoft Learn – ASP.NET Core Inspire Series
Conclusion
Integrating RabbitMQ with .NET Aspire can significantly enhance the scalability and reliability of your application, enabling efficient message queuing and asynchronous processing. By following the steps outlined in this guide, you can seamlessly set up RabbitMQ in your .NET Aspire environment, ensuring smooth communication between different parts of your system. Whether you’re building a microservices architecture or just need better handling of background tasks, RabbitMQ provides a robust solution for message-driven applications. Embrace this powerful combination to boost performance, maintainability, and responsiveness in your .NET applications.
GitHub Link :- https://github.com/saineshwar/Aspire_RabbitMQ