In RabbitMQ, a virtual host (vhost) is a logical grouping of resources such as exchanges, queues, bindings, and users. It allows you to create isolated environments within a single RabbitMQ instance, enabling multiple applications or tenants to share the same RabbitMQ server without interfering with each other. Each vhost has its own set of permissions and configurations, which helps manage access control and resource allocation.

Key Points:
- Isolation: Vhosts provide isolation between different applications or tenants.
- Permissions: Access to resources within a vhost is controlled by user permissions.
- Configuration: Each vhost can have its own configuration settings.
- Multi-tenancy: Vhosts enable multi-tenancy on a single RabbitMQ instance.
Example Use Case:
Suppose you have two different applications, AppA and AppB, running on the same RabbitMQ server. You can create two separate vhosts, vhostA and vhostB, to ensure that the resources and messages of AppA do not interfere with those of AppB.
We can create different virtual hosts and each virtual host will have users.
How to Create a Virtual Host
To create a new virtual host, first log in using the default credentials, then go to the Admin tab.
Open RabbitMQ Management UI (http://localhost:15672/).

Go to Admin > Virtual Hosts.
Click Add a new virtual host.

After selecting ‘Virtual Hosts,’ you’ll see the default virtual hosts. Below that, click ‘Add a new virtual host’ to expand the panel.

After expanding the panel, enter a name for the virtual host. Here, I’m using ‘DemoVirtualHost.’ Then, click ‘Add Virtual Host‘ to create it.

After adding a virtual host, it will appear in the ‘All Virtual Hosts‘ panel.

So far, we’ve created a virtual host but haven’t assigned a user to it. Now, let’s create a new user.
How to Create a User
In this section, we’ll create a new user. Set the username to ‘AdminUser‘ and the password to ‘Admin@123‘ Then, assign the ‘administrator‘ privilege by clicking the ‘Admin‘ link, which will populate the tags field. Finally, click ‘Add User‘ to create the new user.

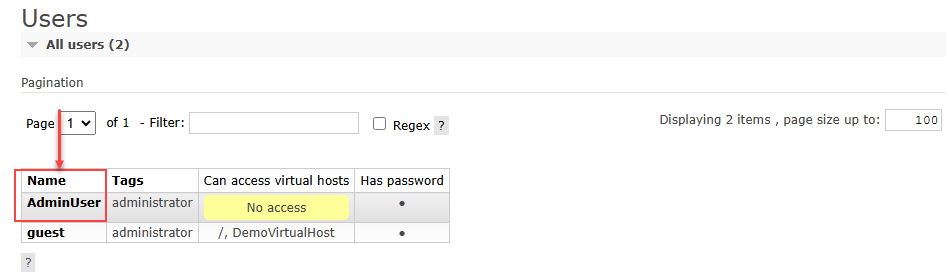
After adding a user, expand the ‘All Users‘ panel to view the list of users. You’ll see the new user, ‘AdminUser,’ but in the ‘Can Access Virtual Hosts’ column, the value is ‘No Access,’ indicating that the user doesn’t have privileges for virtual hosts.

Granting privileges to access virtual hosts
For setting permission just click on the username which we have created “AdminUser”.
Click on ‘AdminUser,’ then navigate to the Permissions panel below the Overview panel.
Expand the Permissions panel and click the ‘Set Permission‘ button to grant access to ‘AdminUser.

The default value is ‘.*‘, which allows access to all exchanges and queues in the virtual host.
Once the permission is set, the “Current permission” will be displayed as shown below.

Now, you can log in as an ‘AdminUser‘ to the RabbitMQ Web Management Plugin.
Let’s Login

Below is a screenshot after logging into the RabbitMQ Web Management Plugin with the new user, “AdminUser“.

We have now completed creating a new virtual host and assigning a new user to it.
Conclusion
In conclusion, we have walked through the entire process of creating a new virtual host in RabbitMQ. This included logging in with default credentials, navigating to the ‘Virtual Hosts‘ section, and adding a new virtual host. We then created a new user, ‘AdminUser,’ assigned the necessary ‘administrator‘ privileges, and ensured the user could access the virtual host. Finally, we verified that the user had access by logging into the RabbitMQ Web Management Plugin. This process ensures that the virtual host is properly set up and that the user has the necessary permissions to interact with it.