

A queue is a storage mechanism in RabbitMQ where messages from exchanges are held until a receiver consumes them.


How Queues Work
- Binding to an Exchange: Queues are connected to exchanges through bindings, which define the rules for how messages from an exchange are routed to the queue. These rules can involve routing keys or more complex patterns.
- Message Storage: Once messages are routed from an exchange, they are stored in the queue. If no queue is bound to an exchange or the message doesn’t match any binding rules, the message may be dropped.
- Consumption: Messages in the queue are delivered to consumers (applications or services) that are subscribed to it. A consumer can:
- Acknowledge (ACK) a message, signalling successful processing.
- Reject (NACK) or not acknowledge, leading the message to be requeued or dropped, depending on the settings.
Benefits of Using Queues in RabbitMQ
- Decoupling: Producers and consumers don’t need to interact directly; the queue acts as an intermediary.
- Scalability: Multiple consumers can read from the same queue to distribute the workload.
- Reliability: Persistent queues ensure that no message is lost due to temporary system issues.
- Flexibility: Queues can be configured with different properties (e.g., TTL, max length, or overflow policies) to suit various use cases.
Configure Queue
Queue Name


The queue name is a unique identifier for a queue that can be referenced in the application. It must adhere to the following rules:
- Uniqueness: The name must be unique within the application.
- Restrictions: It cannot be a system-defined queue name.
Durability


Durability is a property of a queue that determines whether messages in the queue can survive server (broker) restarts. There are two durability options:
- Durable
- If a queue is marked as durable, it will persist across server restarts.
- This ensures that the queue remains intact, along with its metadata, even after the broker restarts.
- Transient (Non-Durable)
- If a queue is marked as transient, it will not survive server restarts.
- Such queues are temporary and are typically used for short-lived or less critical messaging scenarios.
Auto-Delete

Auto-delete is a property of a queue that determines whether it is automatically deleted under specific conditions.
Options
- Yes: The queue will be auto-deleted.
- No: The queue will persist and will not be automatically deleted.
If the queue is exclusive, the durability attribute becomes irrelevant since the queue will be deleted when the client disconnects or its connection is lost. Auto-deleted queues are removed when:
- The last consumer is cancelled, or
- The channel is closed, or
- The connection is lost.
If the queue never had a consumer, it will not be deleted.
Arguments
Optional parameters that can modify the behaviour of the queue or enable additional features. These arguments are typically passed during queue declaration.
Common Example
Message TTL (Time-To-Live)


- Sets a lifespan for messages in the queue.
- Messages exceeding this time are discarded.
- Unit: Milliseconds.
- Example Argument:
{ "x-message-ttl": 60000 } // Messages live for 60 secondsQueue Length Limit


- Restricts the number of messages in the queue.
- Excess messages are discarded based on the queue’s overflow policy (e.g., the oldest message dropped).
- Example Argument:
{ "x-max-length": 1000 } // Maximum 1000 messagesQueue Overflow Policy


Determines what happens when the queue reaches its length limit.Options:
drop-head(default): Removes the oldest message.reject-publish: Rejects incoming messages when the queue is full.
{ "x-overflow": "reject-publish" }Dead-Letter Exchange (DLX)
Specifies an exchange to which messages are redirected when they cannot be delivered (e.g., expired, rejected, or undeliverable messages).


{ "x-dead-letter-exchange": "my-dlx" }Queue TTL


- Specifies the time-to-live for the queue itself.
- If the queue is not used within the specified time, it is deleted.
- Example Argument:
{ "x-expires": 300000 } // Queue expires after 5 minutesCreating Queue
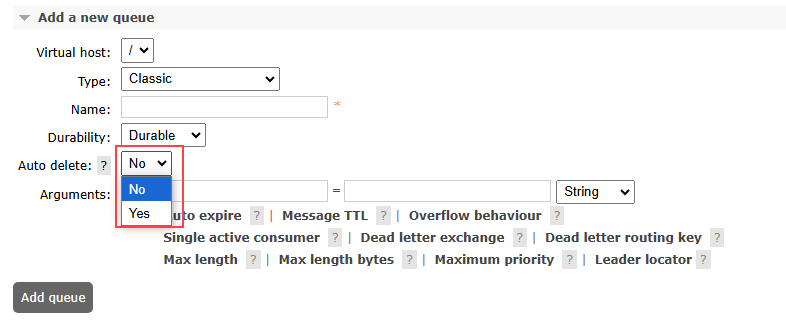
To create a queue, click on the “Queues” tab in the web management plugin.
First, we will start by naming the queue “test-queue.” Then, set the durability to “Durable.” Finally, set the “Auto Delete” option to “No” and click the “Add queue” button to create the queue.
Go to the Queues Tab
After logging in, click on the “Queues” tab in the top navigation bar.


After adding a new queue in the RabbitMQ Web Management UI, you can easily find and view the queue you just created. It will be listed just above the “Add queue” panel.


Referenced from:- https://www.rabbitmq.com/
👉Read the Full Article on exchange here: https://tutexchange.com/types-of-exchanges-in-rabbitmq-explained/
👉Read the Full Article on bindings here: https://tutexchange.com/mastering-rabbitmq-bindings-a-simple-guide-to-linking-exchanges-and-queues/