

Here, you’ll learn how to perform CRUD operations in blazor with Entity Framework Core in simple steps.
Complete Source Code on Github


Creating Application in simple steps
- Open Visual Studio 2019
- In the search bar of Visual Studio, we are going to enter text blazor to search. The first result which appears is Blazor App we are going to choose it.
- Next step, we will configure the project name, the location where we want to store this project, and set the solution name.
- Next, we are going to get 2 hosting models options from that. We are going to choose Blazor Server
- Application is Created.


Project structure


Tables which we are going to Use


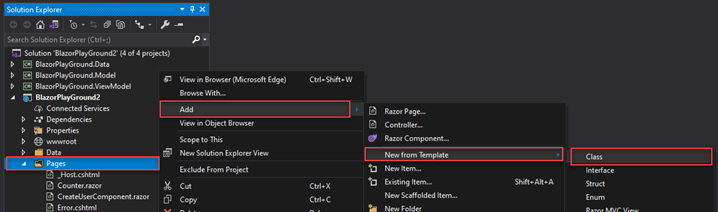
Adding Class Library
Added 3 class libraries to projects
- BlazorPlayGround.ViewModel :- All Project ViewModel will be kept in this library
- BlazorPlayGround.Model :- All Project Model will be kept in this library
- BlazorPlayGround.Data :- This Library will contain Interface and Concrete class and DatabaseContext class which will communicate with the database.


Adding Entity Framework Core package from NuGet
This part will learn how to add the Entity Framework Core package to the project from the NuGet package manager.
To add a package from NuGet, right-click on the project “BlazorPlayGround.Data” and select Manage NuGet Packages from the menu. As you choose it, a new dialogue of NuGet Package Manager with a search box will pop up.
In choose browse tab and search “Microsoft.EntityFrameworkCore.SqlServer” and choose version 5.0.9. the latest version of “Microsoft.EntityFrameworkCore.SqlServer” finally clicks on the install button to add the package.
After adding Microsoft.EntityFrameworkCore.SqlServer to project next, we are going to Configuring Connection string in appsettings.json.
Configuring Connection string in appsettings.json
In this appsettings.json file, we have added the ConnectionStrings section inside that we have added the “DatabaseConnection” key, and the other is value.
Notice:- here, I am using SQL based authentication for database connection that why I have added the User Id and password of the SQL server.
{
  "Logging": {
    "LogLevel": {
      "Default": "Information",
      "Microsoft": "Warning",
      "Microsoft.Hosting.Lifetime": "Information"
    }
  },
  "ConnectionStrings": {
    "DatabaseConnection": "Data Source=DESKTOP-DUM6D15\\MSSQLSERVERSTD; initial catalog=ReSearch; user id=sa; password=#########"
  },
  "AllowedHosts": "*"
}
Adding DatabaseContext Class and inheriting with DbContext class
In BlazorPlayGround.Data Project we will add BlazorPlayGroundContext (DbContext) class which will inherit DbContext class, and the DatabaseContext constructor accepts the DbContextOptions as an argument. The DbContextOptions carries the configuration information needed to configure the DbContext.
using Microsoft.EntityFrameworkCore;

namespace BlazorPlayGround.Data
{
    public class BlazorPlayGroundContext : DbContext
    {
        public BlazorPlayGroundContext(DbContextOptions<BlazorPlayGroundContext> options) : base(options)
        {

        }
    }
}
Adding UserMaster Model in BlazorPlayGround.Model Class Library
In BlazorPlayGround.Model Class Library we are going to add a class with Name UserMasterModel and add properties init.


using System;
using System.ComponentModel.DataAnnotations;
using System.ComponentModel.DataAnnotations.Schema;

namespace BlazorPlayGround.Model
{
    [Table("UserMaster")]
    public class UserMasterModel
    {
        [Key]
        [DatabaseGenerated(DatabaseGeneratedOption.Identity)]
        public int UserId { get; set; }
        [MaxLength(100)]
        public string FirstName { get; set; }
        [MaxLength(100)]
        public string LastName { get; set; }
        [MaxLength(100)]
        public string MiddleName { get; set; }
        [MaxLength(100)]
        public string Address { get; set; }
        [MaxLength(100)]
        public string EmailId { get; set; }
        [MaxLength(10)]
        public string MobileNo { get; set; }
        public int? GenderId { get; set; }
        public bool Status { get; set; }
    }
}
Updating BlazorPlayGroundContext Adding UserMaster Model
using BlazorPlayGround.Model;
using Microsoft.EntityFrameworkCore;

namespace BlazorPlayGround.Data
{
    public class BlazorPlayGroundContext : DbContext
    {
        public BlazorPlayGroundContext(DbContextOptions<BlazorPlayGroundContext> options) : base(options)
        {
        }
        public DbSet<UserMasterModel> UserMaster { get; set; }
    }
}
After Configuring BlazorPlayGroundContext class, next, we are going to Register BlazorPlayGroundContext as a service.
public void ConfigureServices(IServiceCollection services)
{
    services.AddRazorPages();
    services.AddServerSideBlazor();
    services.AddSingleton<WeatherForecastService>();

    var connection = Configuration.GetConnectionString("DatabaseConnection");
    services.AddDbContext<BlazorPlayGroundContext>(options => options.UseSqlServer(connection));
}
Now we can use BlazorPlayGroundContext class as a service for dependency injection in the entire Application.
Adding UserMasterViewModel in BlazorPlayGround.ViewModel Class Library
In BlazorPlayGround.ViewModel Class Library we are going to add a class with Name UserMasterViewModel and add properties init.
This ViewModel will be used for creating a form for taking Inputs.


For Using DataAnnotations and Rendering Options, we need to install packages from NuGet
- System.ComponentModel.DataAnnotations
- Microsoft.AspNetCore.Mvc.Rendering
using Microsoft.AspNetCore.Mvc.Rendering;
using System.Collections.Generic;
using System.ComponentModel.DataAnnotations;
namespace BlazorPlayGround.ViewModel
{
    public class UserMasterViewModel
    {

        [Required(ErrorMessage = "First Name is Required")]
        [RegularExpression("^[a-zA-Z ]*$", ErrorMessage = "Enter Valid First Name")]
        public string FirstName { get; set; }

        [Required(ErrorMessage = "Last Name is Required")]
        [RegularExpression("^[a-zA-Z ]*$", ErrorMessage = "Enter Valid First Name")]
        public string LastName { get; set; }

        [Required(ErrorMessage = "Middle Name is Required")]
        [RegularExpression("^[a-zA-Z ]*$", ErrorMessage = "Enter Valid First Name")]
        public string MiddleName { get; set; }

        [Required(ErrorMessage = "Address is Required")]
        public string Address { get; set; }

        [RegularExpression(@"\w+([-+.']\w+)*@\w+([-.]\w+)*\.\w+([-.]\w+)*", ErrorMessage = "Enter valid Email Id")]
        [Required(ErrorMessage = "EmailId is Required")]
        public string EmailId { get; set; }

        [Display(Name = "MobileNo")]
        [RegularExpression(@"^[7-9][0-9]{9}$", ErrorMessage = "Enter Mobileno.")]
        [Required(ErrorMessage = "MobileNo Required")]
        public string MobileNo { get; set; }

        [Display(Name = "Gender")]
        [Required(ErrorMessage = "Gender Required")]
        public string GenderId { get; set; }
        public List<SelectListItem> ListofGender { get; set; }
        public bool Status { get; set; }
    }
}
Adding Interface IUserMasterCommand in BlazorPlayGround.Data Class Library
Here we will add Folder UserMasters in BlazorPlayGround.Data Class Library and in that folder will add 2 more folders, one with the name Command another Queries.
Inside Command Folder, we will add an Interface with the name IUserMasterCommand.


We will declare 3 methods in this interface.
- Insert
- Update
- Delete
using BlazorPlayGround.Model;

namespace BlazorPlayGround.Data.UserMasters.Command
{
    public interface IUserMasterCommand
    {
        string Insert(UserMasterModel userMaster);
        string Update(UserMasterModel userMaster);
        string Delete(UserMasterModel userMaster);
    }
}
Adding Class UserMasterCommand in BlazorPlayGround.Data Class Library
Inside Command Folder, we will add a Class with the name UserMasterCommand, which will inherit the IUserMasterCommand interface.
We are using constructor injection for injecting BlazorPlayGroundContext dependency.
3 methods which we have implemented are used for Inserting, Updating, Deleting User.
using BlazorPlayGround.Model;
using Microsoft.EntityFrameworkCore;

namespace BlazorPlayGround.Data.UserMasters.Command
{
    public class UserMasterCommand : IUserMasterCommand
    {
        private readonly BlazorPlayGroundContext _blazorPlayGroundContext;
        public UserMasterCommand(BlazorPlayGroundContext blazorPlayGroundContext)
        {
            _blazorPlayGroundContext = blazorPlayGroundContext;
        }

        public string Insert(UserMasterModel userMaster)
        {
            try
            {
                _blazorPlayGroundContext.UserMaster.Add(userMaster);
                var result = _blazorPlayGroundContext.SaveChanges();
                if (result > 0)
                {
                    return "success";
                }
                else
                {
                    return "failed";
                }
            }
            catch (System.Exception)
            {
                throw;
            }
        }

        public string Update(UserMasterModel userMaster)
        {
            try
            {
                _blazorPlayGroundContext.Entry(userMaster).State = EntityState.Modified;
                var result = _blazorPlayGroundContext.SaveChanges();
                if (result > 0)
                {
                    return "success";
                }
                else
                {
                    return "failed";
                }
            }
            catch (System.Exception)
            {
                throw;
            }
        }

        public string Delete(UserMasterModel userMaster)
        {
            try
            {
                _blazorPlayGroundContext.Entry(userMaster).State = EntityState.Deleted;
                var result = _blazorPlayGroundContext.SaveChanges();
                if (result > 0)
                {
                    return "success";
                }
                else
                {
                    return "failed";
                }
            }
            catch (System.Exception)
            {
                throw;
            }
        }
    }
}
After Adding the Interface and Concrete class, we need to register the IUserMasterCommand Service in the ConfigureServices method of Startup Class for injecting dependency.
Registering IUserMasterCommand Service in ConfigureServices
public void ConfigureServices(IServiceCollection services)
 {
     services.AddRazorPages();
     services.AddServerSideBlazor();
     var connection = Configuration.GetConnectionString("DatabaseConnection");
     services.AddDbContext<BlazorPlayGroundContext>(options => options.UseSqlServer(connection));

     services.AddTransient<IUserMasterCommand, UserMasterCommand>();
     services.AddSingleton<WeatherForecastService>();
 }
Next, the step we are going to add Component.
Adding Component
We are going to add a Component with the name CreateUserComponent.razor


Adding Base Class for CreateUserComponentBase Component
We will add a class with the name CreateUserComponentBase, and then we will inherit it with ComponentBase.

Next, we are going to add a property in the CreateUserComponentBase Component.
Adding Property and Injecting dependencies
Will add property UserMasterViewModel and inject dependence of IJSRuntime, IUserMasterCommand.
For injecting dependencies in Component, we are going to decorate Service with the [Inject] attribute.
IJSRuntime Service is used to invoke any JavaScript function from .NET code.
using BlazorPlayGround.Data.UserMasters.Command;
using BlazorPlayGround.ViewModel;
using Microsoft.AspNetCore.Components;
using Microsoft.JSInterop;
namespace BlazorPlayGround2.Pages
{
    public class CreateUserComponentBase : ComponentBase
    {
        [Inject] public IJSRuntime JsRuntime { get; set; }
        [Inject] private IUserMasterCommand UserMasterCommand { get; set; }
        public UserMasterViewModel UserMasterVM { get; set; } = new UserMasterViewModel();
    }
}
Next step, we are going to initialize Dropdown inside the OnInitialized method.
Initializing Dropdown List in OnInitialized method
using System.Collections.Generic;
using BlazorPlayGround.Data.UserMasters.Command;
using BlazorPlayGround.ViewModel;
using Microsoft.AspNetCore.Components;
using Microsoft.AspNetCore.Mvc.Rendering;
using Microsoft.JSInterop;

namespace BlazorPlayGround2.Pages
{
    public class CreateUserComponentBase : ComponentBase
    {
        [Inject] public IJSRuntime JsRuntime { get; set; }
        [Inject] public IUserMasterCommand UserMasterCommand { get; set; }
        protected UserMasterViewModel UserMasterVM { get; set; } = new UserMasterViewModel();

        protected override void OnInitialized()
        {
            UserMasterVM.ListofGender = new List<SelectListItem>()
            {
                new SelectListItem()
                {
                    Text="Select",
                    Value =""
                },
                new SelectListItem()
                {
                    Text="Male",
                    Value ="1"
                },
                new SelectListItem()
                {
                    Text="Female",
                    Value ="2"
                }
            };
            UserMasterVM.Status = false;
        }
    }
}
Next, we will add the Event Callback method FormSubmitted which will be invoked when a form is successfully submitted without any validation error.
Adding Event Call Method Form Submitted
This method will get called when the form is submitted without any validation error.
Using JsRuntime, we are going to show a confirmation dialogue box. If the user confirms it, we will create the UserMasterModel object and pass it to the Insert method of the UserMasterCommand Concrete class.
protected async void FormSubmitted()
{
    bool confirmed = await JsRuntime.InvokeAsync<bool>("confirm", "Are you sure You want to Submit Form?");
    if (confirmed)
    {
        var userMaster = new UserMasterModel()
        {
            Address = UserMasterVM.Address,
            EmailId = UserMasterVM.EmailId,
            FirstName = UserMasterVM.FirstName,
            GenderId = Convert.ToInt32(UserMasterVM.GenderId),
            LastName = UserMasterVM.LastName,
            MiddleName = UserMasterVM.MiddleName,
            MobileNo = UserMasterVM.MobileNo,
            Status = UserMasterVM.Status,
            UserId = 0,
        };

        UserMasterCommand.Insert(userMaster);

        UserMasterVM = new UserMasterViewModel();
        UserMasterVM.ListofGender = new List<SelectListItem>()
        {
            new SelectListItem()
            {
                Text="Select",
                Value =""
            },
            new SelectListItem()
            {
                Text="Male",
                Value ="1"
            },
            new SelectListItem()
            {
                Text="Female",
                Value ="2"
            }
        };

        UserMasterVM.Status = true;
    }
    else
    {
        await JsRuntime.InvokeVoidAsync("Alert", "Cancel");
    }
}
Next, we are going to work on CreateUserComponent.razor page, which we have added earlier.
CreateUserComponent.razor page
- Going to add the @page Razor directive and specify the route for Component (CreateUser)
- Adding @inherits directive and set base class for Component (CreateUserComponentBase).
- Adding EditForm Component Which Renders a form element and setting Model (Model=”@ UserMasterVM”) and OnValidSubmit (OnValidSubmit=”@FormSubmitted“) Properties of it.
@page "/CreateUser"
@inherits CreateUserComponentBase

<div class="col-md-12">
    <EditForm Model="@UserMasterVM" OnValidSubmit="@FormSubmitted">
        <div class="card">
            <div class="card-header">
                <h5 class="card-title">Add</h5>
            </div>
            <div class="card-body">

                <DataAnnotationsValidator/>
                <div class="form-row">
                    <div class="form-group col-md-4">
                        <label for="FirstName">First Name: </label>
                        <InputText id="FirstName" class="form-control" @bind-Value="@UserMasterVM.FirstName" placeholder="Enter First name"></InputText>
                        <ValidationMessage class="text-danger" For="@(() => UserMasterVM.FirstName)"/>
                    </div>
                    <div class="form-group col-md-4">
                        <label for="MiddleName">Middle Name: </label>
                        <InputText id="MiddleName" class="form-control" @bind-Value="@UserMasterVM.MiddleName" placeholder="Enter Middle name"></InputText>
                        <ValidationMessage class="text-danger" For="@(() => UserMasterVM.MiddleName)"/>
                    </div>

                    <div class="form-group col-md-4">
                        <label for="LastName">Last Name: </label>
                        <InputText id="LastName" class="form-control" @bind-Value="@UserMasterVM.LastName" placeholder="Enter Last name"></InputText>
                        <ValidationMessage class="text-danger" For="@(() => UserMasterVM.LastName)"/>
                    </div>
                </div>
                <div class="form-row">
                    <div class="form-group col-md-4">
                        <label for="Address">Address: </label>
                        <InputTextArea id="Address" class="form-control" @bind-Value="@UserMasterVM.Address" placeholder="Enter Address"></InputTextArea>
                        <ValidationMessage class="text-danger" For="@(() => UserMasterVM.Address)"/>
                    </div>
                    <div class="form-group col-md-4">
                        <label for="Address">EmailId: </label>
                        <InputText id="EmailId" class="form-control" @bind-Value="@UserMasterVM.EmailId" placeholder="Enter EmailId"></InputText>
                        <ValidationMessage class="text-danger" For="@(() => UserMasterVM.EmailId)"/>
                    </div>
                    <div class="form-group col-md-4">
                        <label for="Address">MobileNo: </label>
                        <InputText id="MobileNo" class="form-control"  @bind-Value="@UserMasterVM.MobileNo"maxlength="10" placeholder="Enter MobileNo"></InputText>
                        <ValidationMessage class="text-danger" For="@(() => UserMasterVM.MobileNo)"/>
                    </div>
                </div>
                <div class="form-row">
                    <div class="form-group col-md-4">
                        <label for="GenderId">Gender</label>
                        <InputSelect id="GenderId" class="form-control"
                                     @bind-Value="UserMasterVM.GenderId">

                            @foreach (var state in UserMasterVM.ListofGender)
                            {
                                <option value="@state.Value">@state.Text</option>
                            }
                        </InputSelect>
                        <ValidationMessage For="@(() => UserMasterVM.GenderId)"/>
                    </div>
                    <div class="form-group col-md-4">
                        <label for="Address">Status: </label>
                        <InputCheckbox @bind-Value="@UserMasterVM.Status"></InputCheckbox>
                        <ValidationMessage class="text-danger" For="@(() => UserMasterVM.Status)"/>
                    </div>

                </div>
            </div>
            <div class="card-footer">
                <button type="submit" id="btnsubmit"  class="btn btn-success">Submit</button>
                <a class="btn btn-danger" href="">Clear</a>
                <a class="btn btn-primary" href="/UserGrid">List</a>
            </div>
        </div>
    </EditForm>
</div>
Now Let’s run the Application and access /CreateUser Page.

This is the first part where we are just creating User (Create) Next, we will create a Grid that will display created User, which will have Edit and Delete buttons.
Second Part (Read):- https://tutexchange.com/simple-grid-view-with-blazor-and-entity-framework-core/
New to Blazor then learn quickly in simple steps
PART 2 :- How to Create Blazor Server Application
PART 3 :- How to Create DropdownList in Blazor
PART 4 :- How to Create Radio Buttons in Blazor
PART 5 :- How to Create Checkbox in Blazor
Connect me on Github:- https://github.com/saineshwar